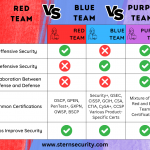
A well-run cybersecurity team operates like a beautiful orchestra, each individual knowing their part and contributing to the same goal. A cybersecurity team may consist of team members wearing numerous hats ranging from management, to defensive, and offensive security. The offensive team members will attack their own organization to find vulnerabilities so the other teams can resolve the issues. The defenders will deploy security software and hardware to shield the organization from attack. Cybersecurity professionals have given color codes to roles within the security orchestra including “Red Team”, “Blue Team”, and “Purple Team”. So what is the difference between a Red Team, a Blue Team, and a Purple Team in cybersecurity? At a high level, the Red Team focuses on offensive security (attacking), the Blue Team works on defending the organization, and the Purple Team is a collaborative effort between the Red Team and Blue Team.
Red Team Details
The Red Team performs the offensive security functions within the organization. In other words, the Red Team mimics Tools Tactics and Procedures (TTPs) of real attackers to discover vulnerabilities, exploit them, and gain access to data. The Red Team is comprised of penetration testers (ethical hackers). The Red Team will provide the organization with reports of the discovered vulnerabilities. Members of the Red Team often have cybersecurity certifications geared towards penetration testing. Some of the common certifications for Red Teamers include:
OSCP (Offensive Security Certified Professional)
GPEN (SANS GIAC Penetration Tester)
PenTest+ (from CompTIA)
GXPN (GIAC Exploit Researcher and Advanced Penetration Tester)
Offensive Security Wireless Professional (OSWP)
Burp Suite Certified Practitioner (BSCP)
Blue Team Details
The Blue Team performs the defensive security measures within the organization. They utilize tools and strategies such as SIEMs (Security Information Event Management systems), IPS/IDS (Intrusion Prevention System / Intrusion Detection System), Firewalls, NAC (Network Access Control), Endpoint Protection, File Permissions Restrictions, DLP (Data Loss Prevention), Email Protection, Security Awareness Training, and more. Blue Team members have a wide area of knowledge in order to defend the organization from attack.
Some common certifications on the Blue Team side include, but are not limited to:
Certified Information Systems Security Professional (CISSP)
Various product-specific certifications
Purple Team Details
The Purple Team is generally a collaborative effort between the Blue Team and the Red Team. The Red Team may walk through various stages of an attack using a framework such as MITRE ATT&CK. At the same time, the Blue Team will see which attacks are discovered or blocked and make changes as appropriate. This collaborative effort between teams helps streamline improvements to the security posture. Another positive outcome from the teams working together, is that instead of feeling bad when an attack succeeds or fails, both teams are learning from each other and understand that they are working towards the same goal.
How Can Stern Security Help?
Stern Security has extensive experience working with organizations on Purple Team engagements. The company emulates known threat actors using their Tools Tactics and Procedures (TTPs) to work through the various stages of an attack as charted within the MITRE ATT&CK Framework. Stern Security works with an organization’s Blue Team to see which attacks are discovered, blocked, and which attacks bypass defenses. Our team also helps Blue Teams design defenses to block similar attacks in the future. To top it off, Stern Security gives the Blue Team kudos for all mitigated attacks. Expert penetration testing services are a popular service offering by our organization. Stern Security’s Velocity application can be used to perform internal risk assessments, identify gaps, and view actionable recommendations to improve security.
Conclusion
Within a cybersecurity team, Blue Teams are defensive, Red Teams are offensive, and Purple Teams are a collaborative effort between the Blue and Red Teams. Individuals within these groups may have different skillsets and certifications, but they are all working towards reducing risk within the organization.
A Vulnerability Scan is NOT a Penetration Test. Unfortunately, when we perform third-party reviews or risk analyses, we often see that organizations get these two terms mixed. In this article, we are providing information about the differences so companies get the accurate services they need (and paid for) and they can achieve their compliance goals.
Here is a quick high-level guide to help clarify the differences.
Exploitation – penetration tests (pen tests) exploit vulnerabilities to gain additional access. Vulnerability scans search for vulnerabilities, but don’t exploit them.
Automation – vulnerability scans are automated processes. An individual configures the scan and then the program does all of the scanning for vulnerabilities. Penetration Testing is largely a manual process although the security professional often uses an array of tools to assist including vulnerability scanners. Penetration Testing requires a more advanced skill set as the security professional needs to find new ways of compromising systems.
Attack Simulation – a penetration test simulates a full cyber attack from initial reconnaissance to active testing to obtaining credentials to elevating privileges to accessing data to exfiltration of the data. A vulnerability scan typically consists of a single attack phase.
Cost – since penetration testing requires a more advanced skill set, performs a more comprehensive analysis, and takes more time, the cost is much higher.
Frequency – since vulnerability scans are less expensive and are quicker to perform, they are performed more frequently than penetration testing. While there is much flexibility on the frequency, vulnerability scans are usually performed daily, weekly, or monthly. Penetration Testing is usually performed annually or after major changes in an environment.
While there are a number of differences, both penetration testing and vulnerability scanning are best practices in a security program.
Weak passwords are often the cause of data breaches. Love or hate them, everyone is using passwords today. Ensuring individuals are using strong passwords in important to securing an organization. Whether you’re performing a penetration test or a password audit, tools can help you add value and efficiency for your report.
At Stern Security, we created a tool called PassTheStats (https://github.com/sternsecurity/PassTheStats) to provide insight into the password strength. This has been incredibly helpful on penetration tests as we use the tool to perform password audits when we gain access to password databases. Simply feed the tool a text file of usernames and passwords in the format “username:password”, and the tool will give you the following:
Number of passwords less than 8 characters
Number of passwords equal to their username
Number of accounts with blank passwords
Number of accounts that may be administrators
Number of non-complex passwords
Top 10 most popular passwords
A full list of accounts with weak passwords and the reason each is weak
This tool has added great value to our penetration test reports, increased efficiency, and helped increase security. We hope you find it valuable as well 🙂
Technical Info Here are some quick technical points to help you use the tool.
Download a. Download the tool with the following command: git clone https://github.com/sternsecurity/PassTheStats.git
Password List a. There is a sample password list in the folder that is downloaded. You’ll need to use the same format for your file. The format is the following Username1:password1 Username2:password2 Username3:password3
Run the program a. Go to the PassTheStats folder and launch the tool with the following command: python3 PassTheStats.py [PASSWORD_FILE.txt] b. If you are running the command on the provided sample_cracked_password_file.txt, you would type the following: python3 PassTheStats.py sample_cracked_password_file.txt
Results a. The executive overview will be posted to the screen. The details of all of the password issues will be listed in a file that gets generated.
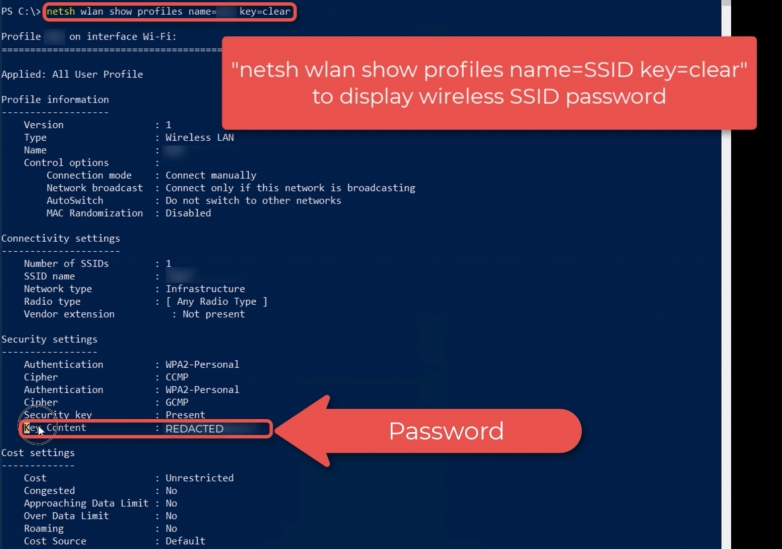
Without using any 3rd party tools, you can use simple Window commands to display the saved passwords for remembered wireless networks. This is helpful if you forget or during security engagements.
Stern Security gained access to a laptop on a recent penetration test. We needed to gain access to a particular wireless network didn’t want to risk tripping any alerts so we just used Windows commands to get the passwords to saved wireless networks.
Here’s how:
List all saved wireless networks In order to list all saved wireless networks on a Windows device, use the following command:
netsh wlan show profiles
Display password Next, to display the password for a particular Wireless SSID profile, use the following command. Insert the SSID/Profile Name for “PROFILENAME” below:
netsh wlan show profiles name=PROFILENAME key=clear
Pyoneer was created to assist with the search for sensitive information while on customer engagements. The tool has been used in different scenarios, not just for penetration testing, but that is where the tools development began. Pyoneer’s base script was written overnight while sitting in a hotel room on an engagement. The idea came while completing another script, Spyder, to ingest a CSV file and mount shares, “Wouldn’t it be great to have something to automatically scan these shares?”. A quick search for an open-source tool turned up nothing, so I began writing the foundation of the script. It was in no way ready during the engagement and the development continued at home. It took roughly a week to complete the script.
While using the script on engagements it was clear it was lacking functionality and speed. The first iteration of the script treated all files as flat files and would perform regex searches based on a set of search terms and output a very basic log file. This led to figuring out how to scan file formats and the relevant data within files instead of the entire file. Enter file extension checking and “processing”. Functions were created to process doc(x), xls(x), pdf, image OCR (jpg, png, tiff). Each has its own requirements to pull only the data you want, office docs pre-office 2007 can be treated as OLE flies, 2007 and later need to be processed as zip files and specific xml tags contain the relevant data. Images require an OCR processor, PDFs need to be processed per page and images need to be extracted and run through an OCR processor separately.
Ok awesome, now I’m looking at the data I need, but do I need to open and scan every file or folder? Engagements are typically a week long, that doesn’t allow for much time to look for sensitive information even with automated scanning. Excluding as much as possible without missing important information is a balancing act. For this this I added filename, folder and extension exclusion lists to shorten the overall number of files being scanned. At the same time, options for database, virtual machine, and ransomware files were added.
Sweet, this thing is starting to run through file systems faster and produce more meaningful results. Is there any way to further speed up script? What about multi(threading/processing)? What about limiting concurrent matches in a single folder? What about being able to resume the script? The functionality could be endless….
AsyncIO and concurrent futures was added to help with multi-processing and file context handling. Python doesn’t have multi(threading/processing) natively and AsyncIO/Concurrent Futures is just a band aid but still works well enough. The integration of those two helped to speed up the script quite a bit. File match limiting per folder was also added, the limit is set via variable but helps to avoid scanning a folder with a large number of files that might contain the same data. The match is based on consecutive number of matches for the file extension. EG: 10 consecutive matches for .docx in the same folder. At this time, the ability to resume the script was added, this option is set via a Boolean variable in the script. It works by reading the last line in the output file and parsing the file path. The script the loops through the files till there is a match to the path and then picks up where it left off and starts scanning files again.
While the script has evolved quite a bit from where it first began, there is still more I’d like to add:
OCR for images in PDF files
User input on the CLI for user options
Expanding the database functionality
Expanding the regex patterns
Searching filenames for search terms
Better output
Add data size search limit EG. Search the first 25MB of a file
Pyoneer has a number of variables enable and disable functionality or set limits and paths: excludeExt- list of file extensions that are excluded. excludeFile- list of filenames with extension that are excluded. excludedirs- list of folder names that are excluded. checkfordb- Boolean true/false to check for the file extensions in listed in the dbExt variable. dbExt- list of database file externsions to check for. checkforransom- Boolean true/false to check for the file extensions in listed in the ransomExt variable. ransomExt- list of ransomware file extensions to check for. Checkforvm- Boolean true/false to check for the file extensions in listed in the vmExt variable. vmExt- list of virtual machine file extension to check for. searchTerms- regex list of words to search for separated by pipe ( | ). rootPath- this is the path that you want to search. EG. /mnt outputPath- this is the path where you want output file to be placed. EG. /home/output.csv resumescript- Boolean, if true, file will read the last line of output and begin searching for that file and begin scanning once found. matchlimit- this is the consecutive file extension limit per folder.
The script in its current state doesn’t require any CLI input and can be executed with ‘python3 pyoneer.py’